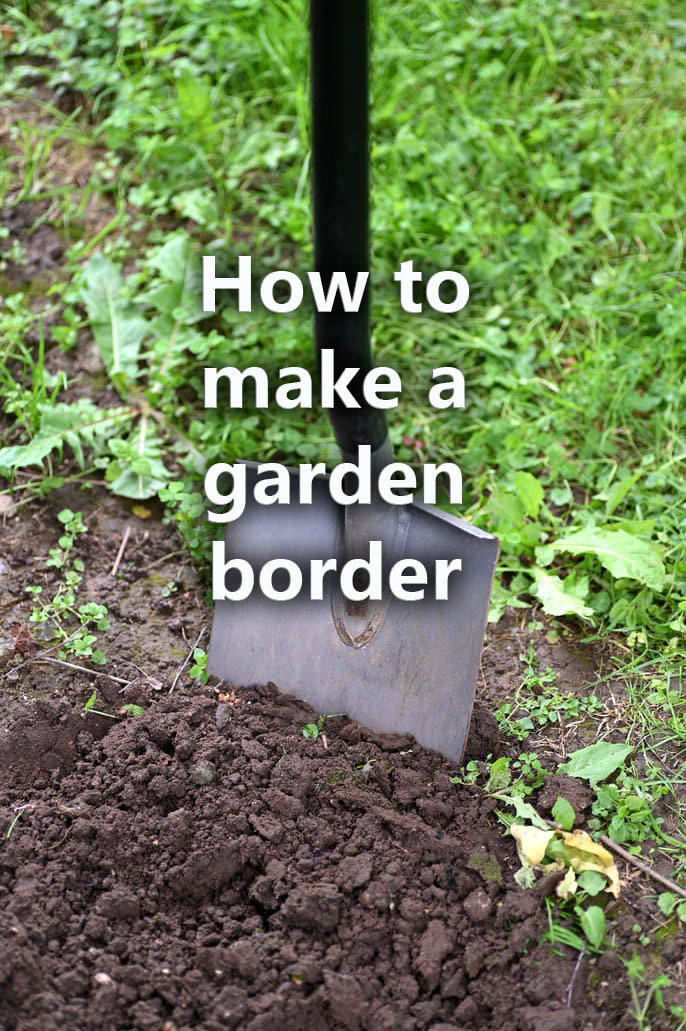
This article contains affiliate links
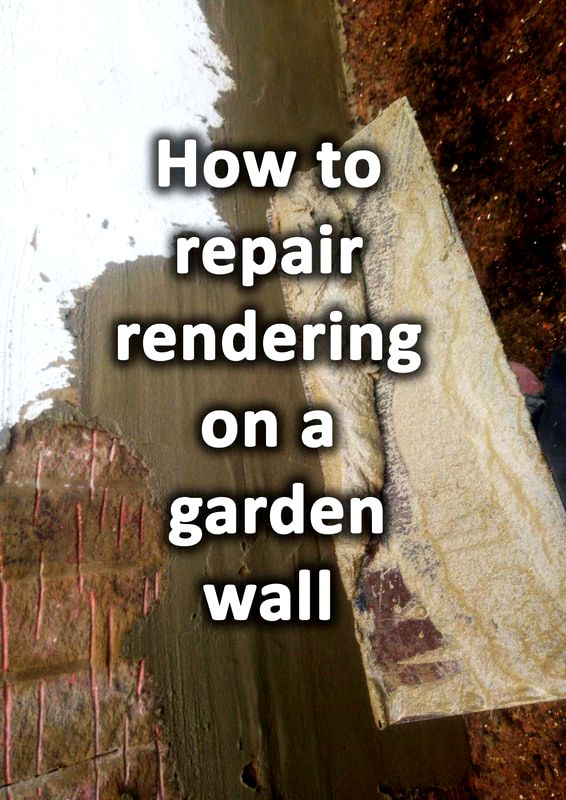
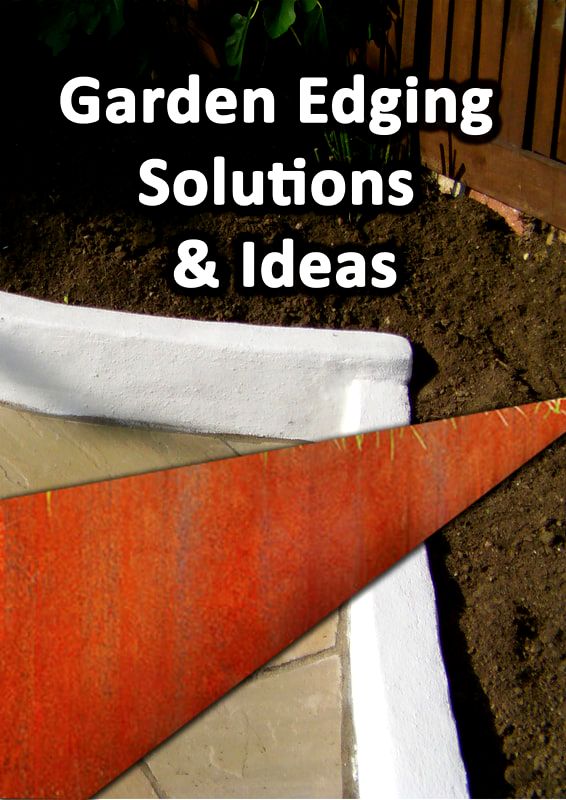
Render is a fantastic way to create a smooth or textured surface to old masonry work. External rendering is suited to many garden styles including modern and traditional design. However, render is not without its drawbacks and it is sometimes common for external render to flake off. There are many reasons why garden wall render can fail including trapped moisture and frost action. In this article I will explain how to remove old render, repair and re-render a garden wall. Can you patch up render on a garden wall?
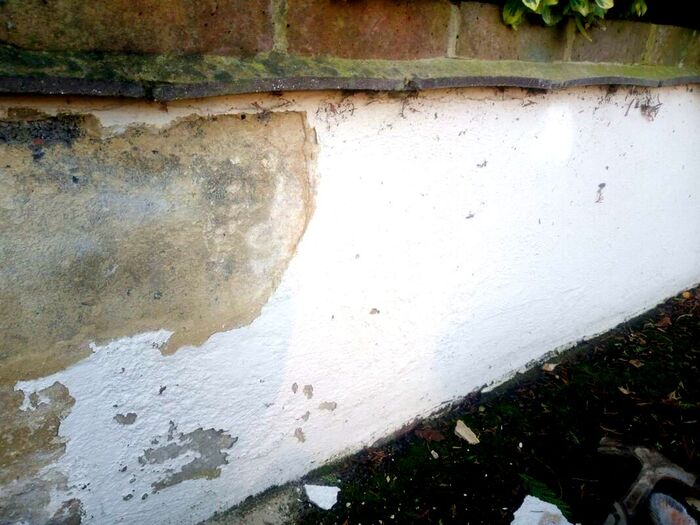
If you’re render is falling off your wall it is very possible you will be able to patch it up. Firstly, you will have to assess the condition of the existing or remaining render. If it sounds hollow when tapped or easily flakes from the wall then it will need to be removed. If most of the remaining render feels strong and robust you can patch up the garden wall with render. 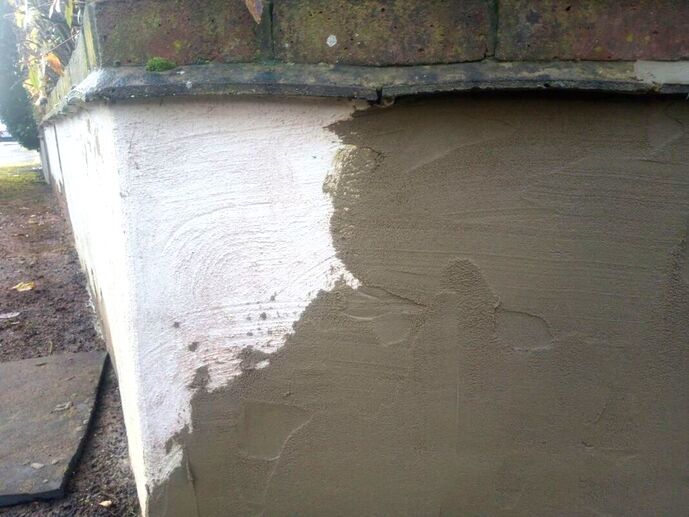
Why is render falling off my garden wall?
Normally rendering falls off a garden wall due to freeze and thaw action. This is where moisture between the render and the wall freezes and expands. The process slowly prizes the render away from the walls surface. This is more typical in low garden walls where there is no damp proof course. Retaining garden walls holding back large volumes of moist soil can also suffer from such action. However, there may be other reasons why mortar is falling of a garden wall. 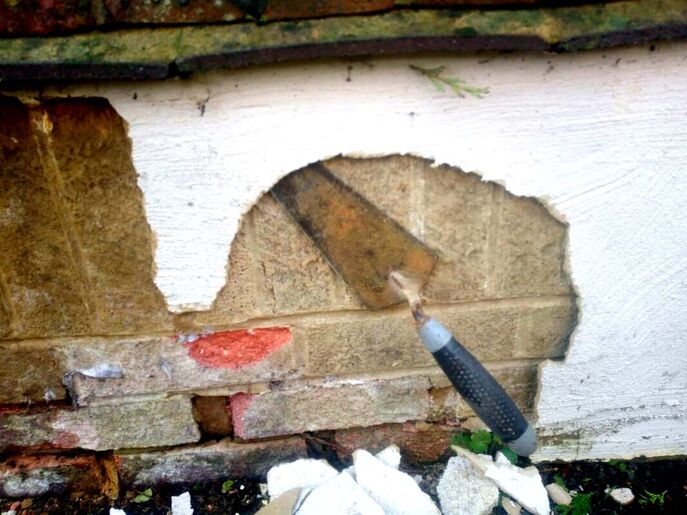
Sometimes brickwork underneath render can slowly start to degrade. When clay bricks become old and wet they can crumble.
This can make render attached to the bricks also flake and fall. Examine the condition of the structural wall underneath the render to see if is crumbly or powdery. It is also the case that when render is applied it can sump and form air pockets if overworked. If render is towelled about too much on the walls surface it can loose its suction bond while setting. Can you repair render yourself?
As complicated as it sounds and seems you can repair render yourself. If you are a complete novice, the smaller the repair area the better! There is nothing wrong with having a go and familiarising yourself with the process. Most of the time you will need to apply a scratch coat first. This can be a good opportunity to practice towelling and finishing. What is the best sand for rendering a garden wall?
The best sand for rendering has consistent, course and circular particles with no large grit or fine silts. Soft powdery sand like 'brick laying sand' can lead to excess moisture absorption and shrinkage leading to cracks. However, gritty sands like sharp sand can contain larger grit particles which can hinder tight towelling and suction. This is why Leighton Buzzard sand is one of the best sands for rendering as it has uniform and circular particles. For the finishing coat a little builder’s, soft sand can be added to reach a smoother, plaster like finish. 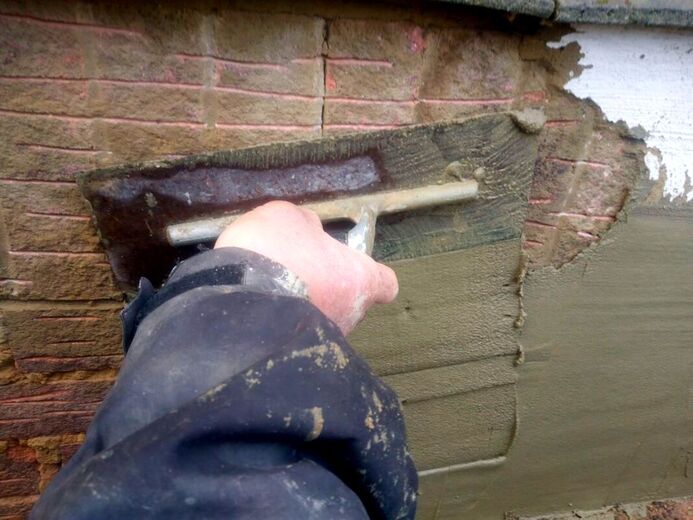
Do you need to add PVA to a rendering mix?
PVA has traditionally been added to walls before rendering and the rendering mix itself. It is said that PVA will help the mortar bond better and help to waterproof the render. However some tradesmen say PVA is not necessary and can reduce renders ability to stick. Whatever the case it is advised that you add some sort of mortar water proofer to your rendering mix. This will minimise exposure to damp and frost damage and help the render to bond. 
What is the best mortar mix for outside rendering?
For the first coat or 'scratch coat' 4 parts plastering sand or sharp sand to one part cement. For the finishing coat I mix 4 parts plastering sand 1 part builder’s sand and 1 part cement. You could also use hydrated lime instead of the builder’s sand. Make sure you add plasticiser to make your mix more workable. You can also add water proof admixtures to prevent moisture and frost action. How thick should render be on a garden wall?
Typically about 12 mm is about right for an external rendered garden wall. Don’t forget you will first need to apply a scratch coat of about 5mm. Then you can apply your finishing coat of about 7mm. Why is render not sticking to my wall?
Render may not be sticking to your wall for a number of reasons. The most common reason is fine traces of dust and dirt are preventing render bonding to the wall. To mitigate this, make sure you brush and wash your wall done thoroughly first. During warm and dry weather absorbent walls can suck out renders moisture quickly. This can result in a loss of suction and the render failing to stick to the wall. Trying to apply too much thickness in one go can lead to render simply falling off the wall. How to repair rendering and render a garden wall step by step.
Step 1.
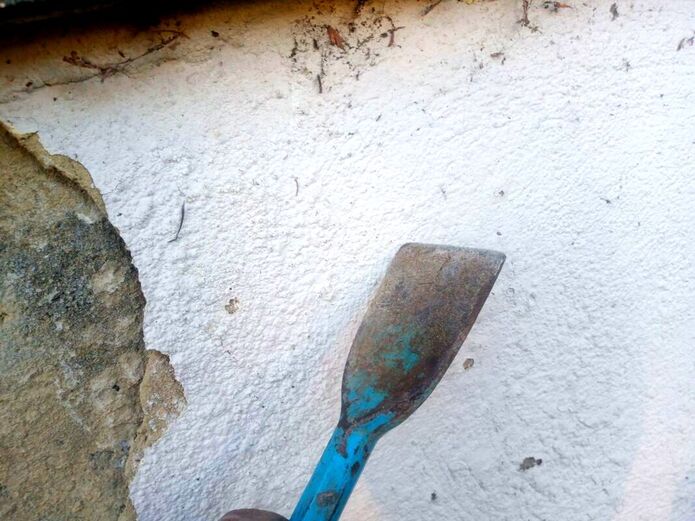
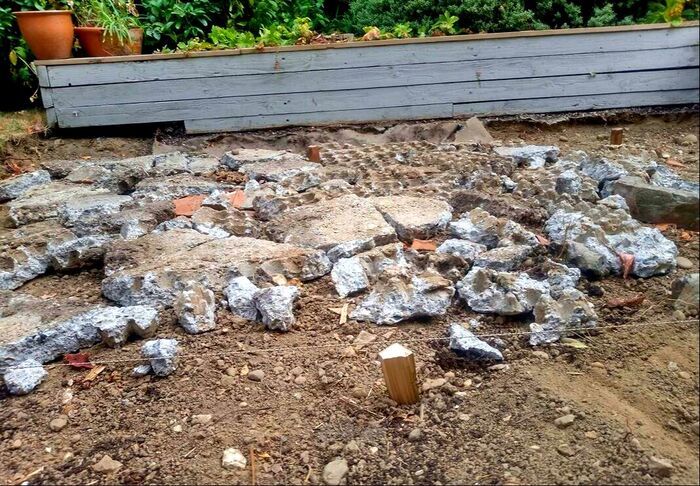
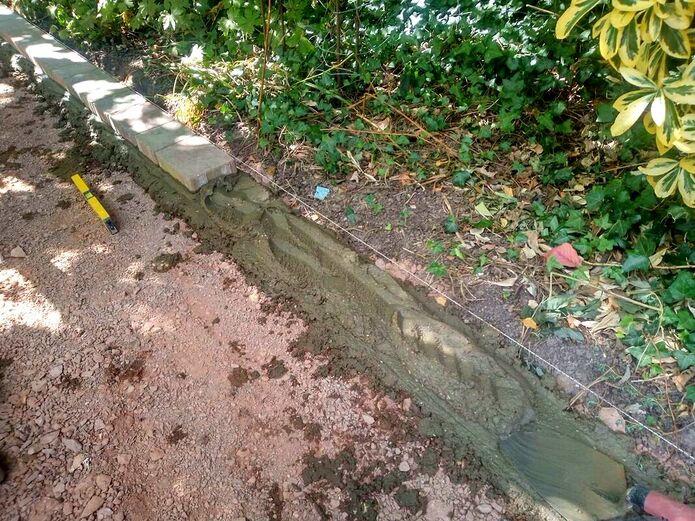
Investigate the existing rendering to see how loose it is and remove any flaking mortar.
Step 2.
Examine the wall further by tapping the surrounding mortar with a bolster. Weak and unbonded render will sound hollow compared to solid areas.
Step 3.
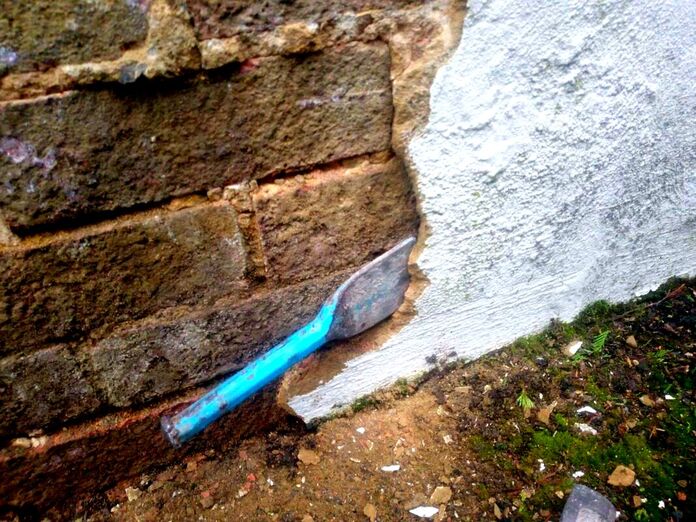
When you have identified hollow render, using a hammer and bolster remove it from the walls surface. You should only really leave render which is solid and cannot be separated from the wall.
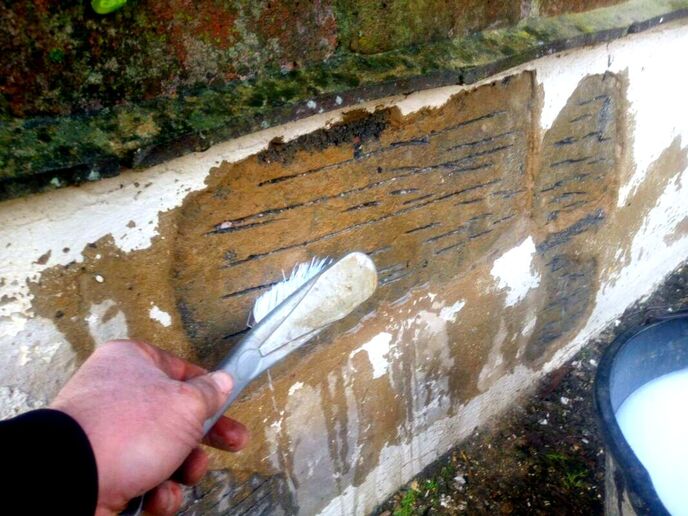
Step 4.
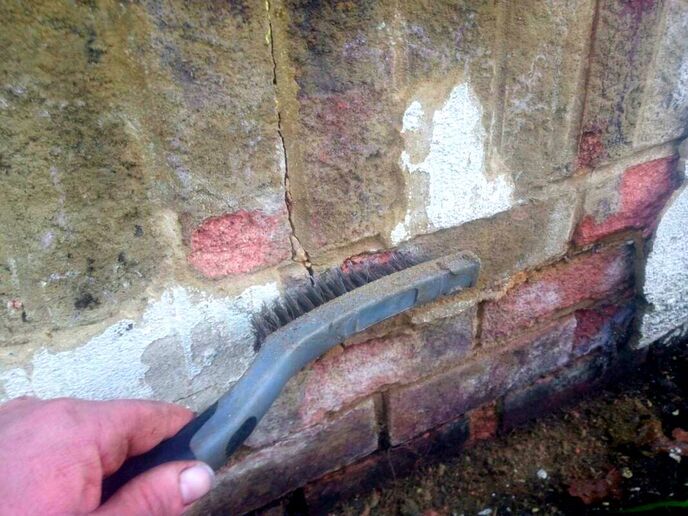
Using a wire brush, brush off any weak rendering or flaking paint from the walls surface. Make sure you wire brush the walls surface to remove any degraded or loose materials.
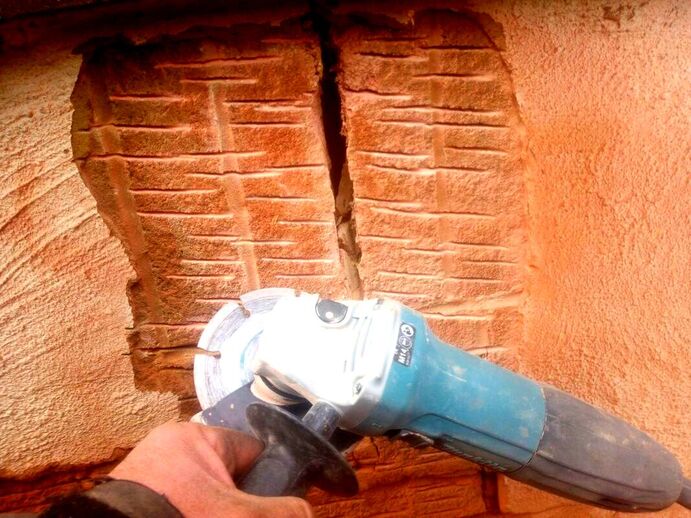
Step 5.
Using a hand grinder, score grooves into the surface of the wall to provide a key for new render. This is not always essential but provides extra grip if you want the strongest result. Make sure you wear a tightly fitted dust mast and eye protection!
Step 6.
Your cutting will create lots of fine dust, consequently when finished you must clean the wall thoroughly. This is best achieved with a bucket of water and a hand brush. Make sure you brush out all the dust residues from the surface and cut scores. You must then allow the wall to dry out.
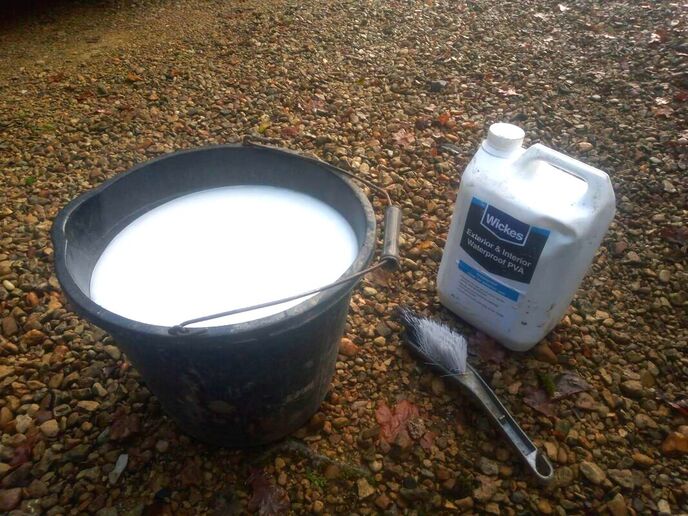
Step 7.
Empty two golf ball sized blobs of external, waterproofing PVA into the bottom of a bucket. Fill the bucket two thirds full with water mixing in the PVA until it dissolves.
Step 8.
Using a hand bush, coat the wall with the PVA solution. This will help the mortar to bond better to the wall below. It is also beneficial to have the wall ever so slightly damp on the surface before applying render.

Step 9.
Mix up your first render coat, I typically use 4 parts plastering sand and 1 part cement. I add about two egg cups of both mortar plasticiser and waterproof PVA to the mix. Mix until it has a stiff but workable consistency.
Step 10.Using a brick laying trowel, load up your rendering trowel with a wide load of render. Start at the base of the wall tilting your wrist so the render gently makes contact. Using a steady movement, glide your hand up vertically forcing a layer of mortar up onto the wall. This will take a little practice to get a feel for how much pressure to apply. Make the render as smooth and as a consistent depth as possible. 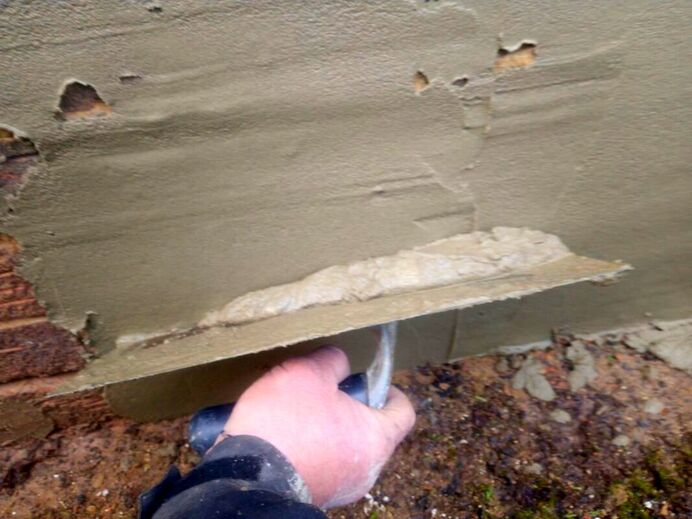
Step 11.
Use this first scratch coat as your practice run for applying the finished, smooth surface! You can use a straight edge to gently screed off high points.
Keep working render into the low points until you have a relatively level surface. When the mortar is starting to go off, score some key lines into the surface. This is the reason for the first coat being called the scratch coat. Allow this at least 24 hours to set before applying the finishing coat. 
Step 12.
Mix up the final coat, This can be slightly weaker than the base scratch coat. I prefer to mix 4 parts plastering sand, 1 part soft sand and 1 part cement. As before, I like to also add plasticiser and PVA External water proofer. Mix until you reach a moist and workable consistency. 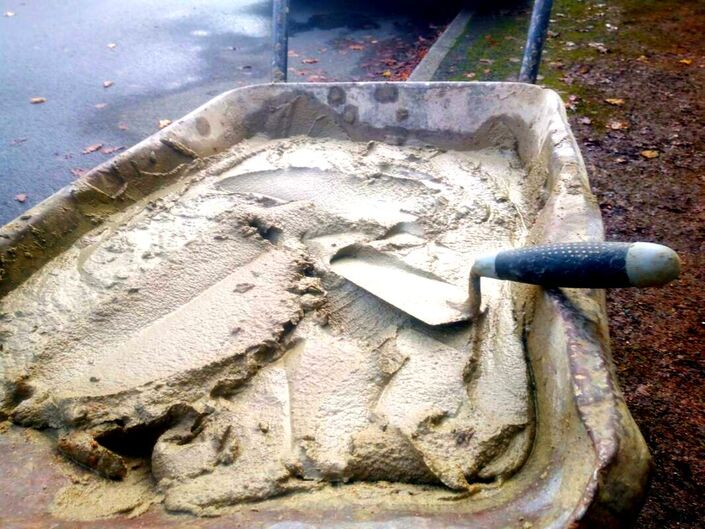
Step 13.Using your rendering trowel apply the render to the wall as evenly and smoothly as you can. Try to keep an even and consistent thickness as this will help the mortar to stick well. You can use a straight edge to gently screed off high areas. As the render starts to dry you can fill in low spots gently. Try not to over work the render as this can lead to air pockets forming and it falling off. Rendering is a bit of a skilled art and will take some time to master. 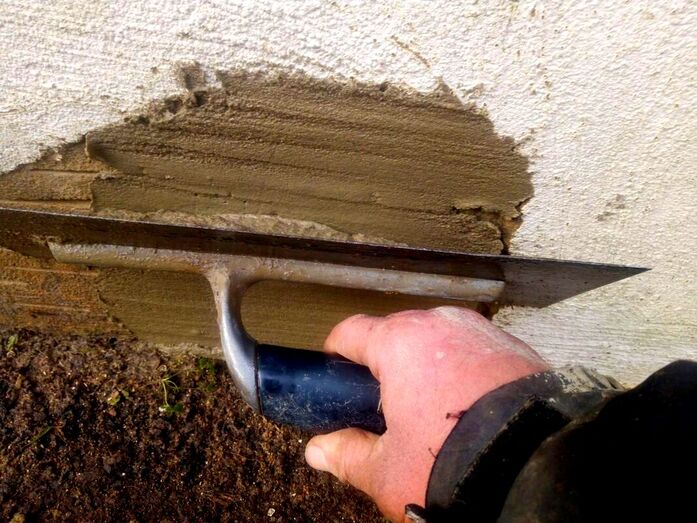
When you have the render as smooth and consistent as possible you can have a rest.
You now have to wait until the face of the render starts to become firm. How long this takes will depend upon the temperature, time of year and the moisture content of the wall. You will have to keep an eye on each section as it can set inconsistently across the walls surface. 
Step 14.
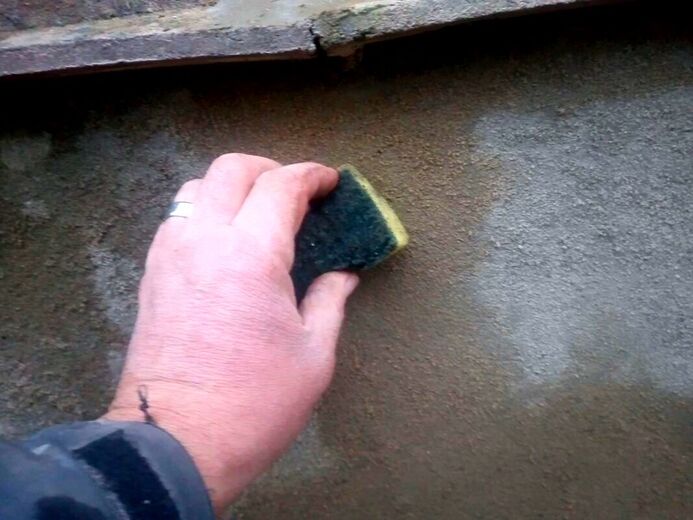
Using a sponge float, or damp sponge, start to softly work the surface of the render in circles. This will slowly open up the surface of the mortar and allow the render to breathe. Gently working the renders surface will allow any small blemishes to be evened out. This gentle process will also allow low spots or hollows to be gradually filled in.
Step 15.
You have now completed your rendered wall and can be pleased with your work of art! Do leave your render at least a couple of weeks to set before painting.
Thank you for reading our article on how to repair rendering and render a garden wall. We have featured some other articles below you may find interesting.
'As an Amazon Associate I earn from qualifying purchases'
2 Comments
This article contains affiliate links
It is very common today to look at concrete paths as old and outdated. However, concrete is still one of the most affordable and versatile building materials.
Concrete paths can be moulded into any form or shape including curves and angles. They also do not have to be visually boring as they can be worked into a wide variety of finishes and textures. Other products such as resin bound aggregates and addagrip can also be applied to the concrete paths surface. There are also a variety of dyes, moulds and paints which can alter and adapt the aesthetic qualities of a concrete path. In this article I will show you how to make a garden path with concrete step by step. Can you lay concrete on soil?
Concrete has a very high compressive strength; however it has a very low tensile capability. Any movement can induce cracking and failure. Therefore, it is important that concrete is laid on a solid base of compacted hardcore. This means you will have to excavate out any soft and loose topsoil before laying concrete. Ideally you will need to dig down to a more rigid and robust sub soil. The depth of the excavation will vary depending on your local soil type. However, generally, a depth of around 170mm is normally sufficient. 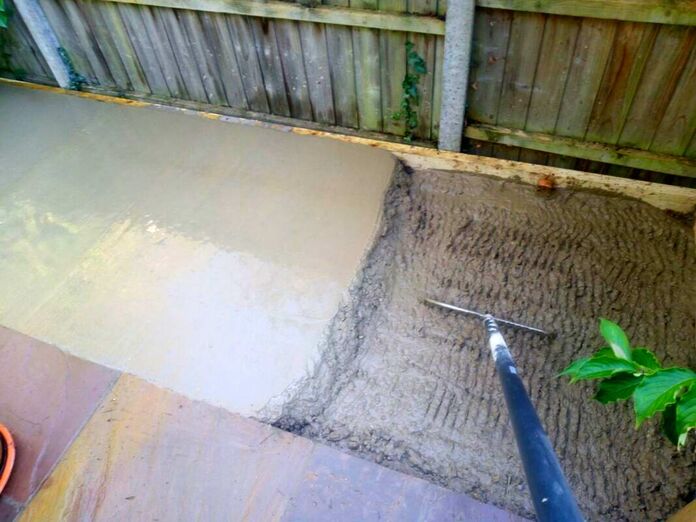
How deep should a concrete garden path be?
Between 4 and 6 inches is about the correct depth of concrete for a path. In metric that is a range between 100 and 150mm. Although in reality the deeper the concrete the better as there is less chance of movement and cracking. I would say 5 inches or 125mm is a good depth of concrete for a garden path. Do you need an expansion joint in a garden path?
For most concrete garden paths you should be able to avoid an expansion joint. However you will need to incorporate metal reinforcing rods or mesh into the concrete. Once a garden path goes beyond 10 metres having some sort of expansion joint becomes inevitable. If you have very stable subsoil and lay at a generous depth you may be ok for a greater distance. My advice is if you really can’t stand the idea of a joint lay the concrete without one. 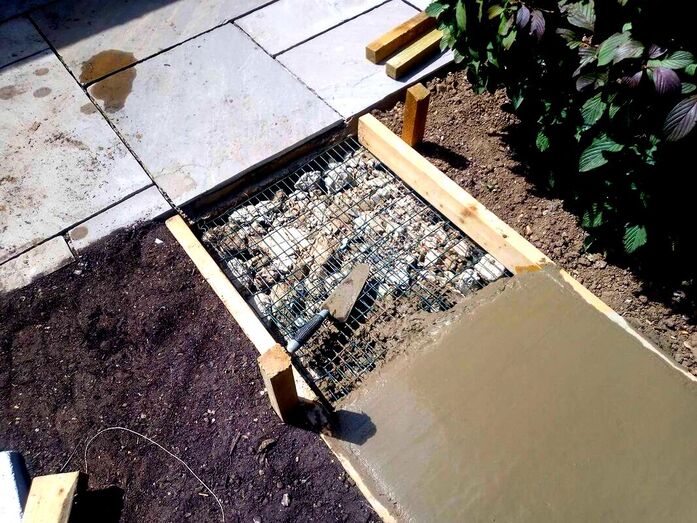
If then it does crack you can cut out a small section later and add one then. Just note if you choose this rout you may not get a consistent colour and finish with newly laid materials.
On the whole the longer distance you wish to go without an expansion joint the thicker and more reinforced your concrete should be. However, I would recommend a joint every 10 metres at most. Expansion joints can be formed with thin ply board or other external grade and rigid, sheet, material. How to make a curvy garden path with concrete?
The great thing about concrete is it can be formed into pretty much any shape. However it will take skilled labour to instate the formwork correctly. In order to make a curvy, garden path, you will need flexible retaining edgings. The most common materials for these are stainless steel edging and thin timber gravel boards. All curved edgings must be flexible but also robust enough to take the weight of wet concrete. This can be achieved by driving in timber stakes in and around the boards with a sledge hammer. Boards can then be fixed using external grade screws and a power drill. Other flexible edgings can be haunched into position with strong mortar mixes. The wet concrete can then be tamped level with the top of the edgings and towelled smooth. 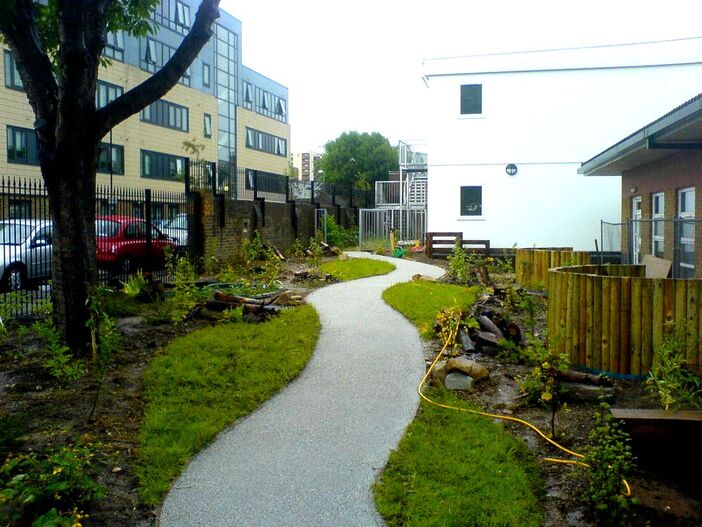
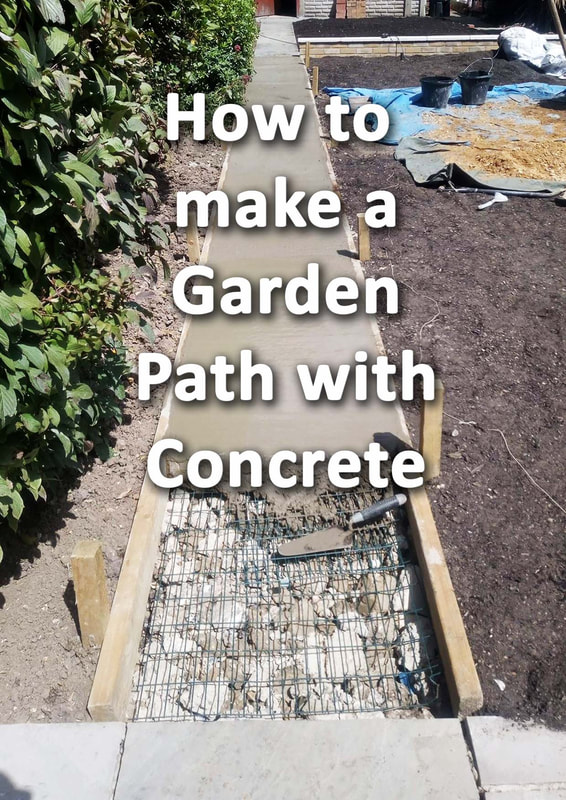
How to make a garden path with concrete step by step
Step 1. Plan the shape, direction and route of your path making sure it is both functional and aesthetic.

Step 2. excavate out any soft soil where the new concrete path is to be situated. This is typically at a depth of about 170mm.

Step 3. Using a string line tightly plot out and realise your finished level. This could be from the level of a back garden shed base to a patio.
Step 4. Using 50mm x 50mm timber pegs peg out to the top of the string line using a sledge hammer. This will enable you see your completed level and mark your concrete and hardcore levels on the timber.
Step 5. Using a pencil or pen, mark your hardcore level onto the pegs. If you are laying 5 inches of concrete the hardcore level will be 5 inches below the top of the peg.
Step 6. install your retaining formwork or edgings these typically consist of timber boards or an edging of some kind. Your formwork or edging level must be consistently flush with the string line or the top of the pegs. This will allow for a consistent gradient with no risk of puddles.
Step 7. Secure your edgings robustly so they can retain the weight of wet concrete. This could be with mortar haunching but also with timber pegs and 6x2 timber like in the example below.

Step 8. apply pressure to your formwork to make sure it doesn’t move under stress. Timber boards can be reinforced and fixed with more pegs and external grade screws.
Step 9. Fill your formwork with a base of compacted hardcore and compact. This helps the ground beneath to bond well to the concrete. Here you can spread old masonry materials like bricks and concrete as long as they are well broken up. However, the best material for this is mot type 1 compactable hardcore.

Step 10. Install reinforcing if necessary, this can be done with metal, reinforcing mesh or any ridgid wire mesh. In the example below I used an old waste egloo chicken run wire mesh. Try to elevate you mesh up so it sits within the centre of the concrete.
Step 11. work out how much concrete you need. For this you will have to measure the surface area and times it by the depth.
Make sure you get the decimal point in the correct place! There are online calculators which can do the calculation for you. However, for example, if you have a path which is 1 metre wide and 10 metres long that will be 10 square metres. If you’re concrete depth is 5 inches or 125mm the calculation is: 10 X 0.125 = 1.25 This means you will need 1.25 cubic metres of concrete for the concrete path. A cubic metre is about two jumbo bags. Bear in mind you should always get a little bit more than what you need to do the job to avoid running out. Therefore you will need about 3 bulk or jumbo bags of ballast to do the concreting. I always allow 6no 25kg of cement for every jumbo bag so you will need 18 bags of cement. 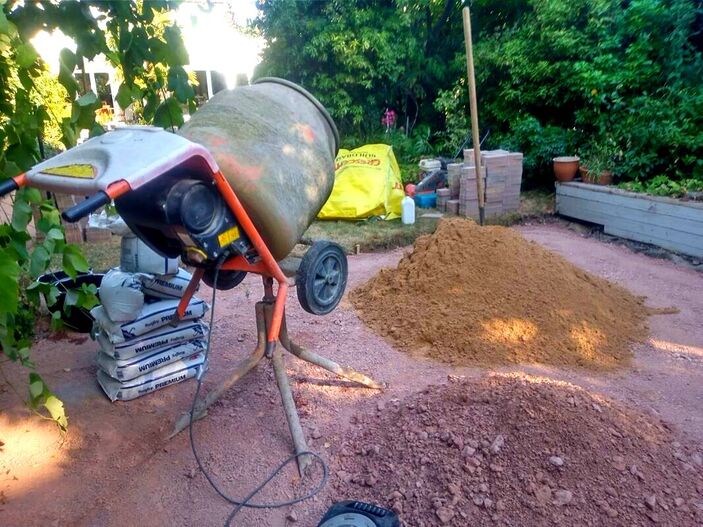
Step 12. Mix your concrete, to get a ratio of 5 parts ballast to 1 part cement, mix half a bag of cement 12.5 kg to about 12 shovels of ballast.
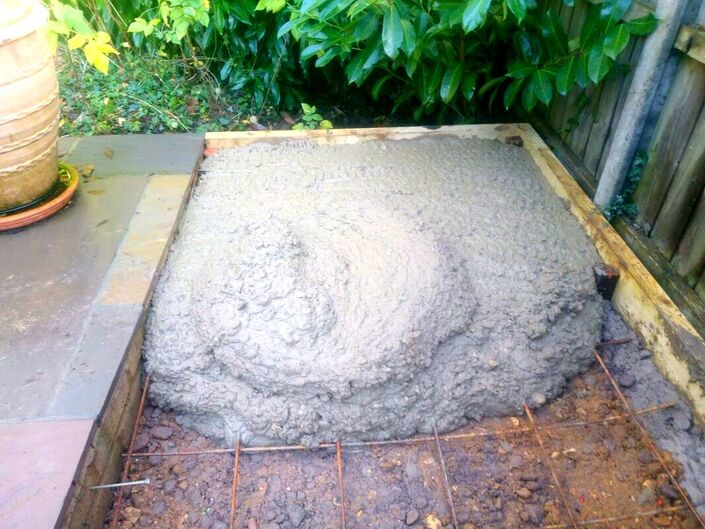
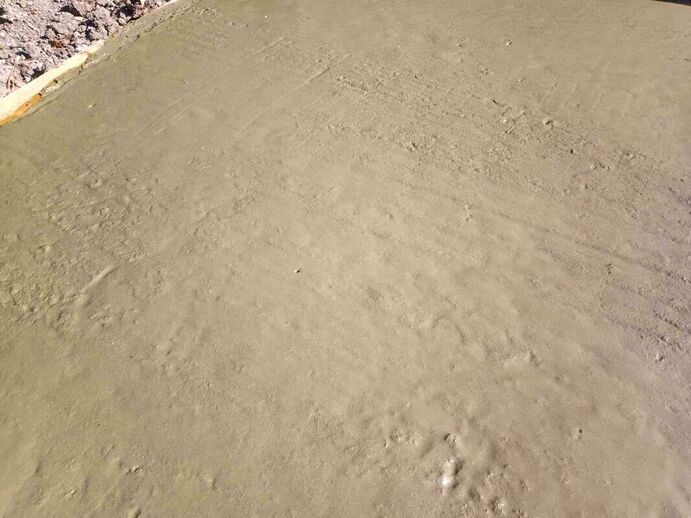
Put two thirds of a bucket of water into the cement mixer and turn it on. Add half a bag of cement and let it turn until all the clods have become soluble with water. Shovel in the sand gradually so it mixes well and allow mixing for at least 1 minute. Your concrete should have the consistency of porridge. It should not be too wet that it runs like water and stiff enough to work with some water on the surface. 
Step 13. Pour your concrete into a wheelbarrow and tip it into your formwork. Using a rake, spade and trowel move about the concrete until it is slightly above your retaining edgings and formwork.
Step 14. tamping. Using a clean straight edge like a piece of timber or long spirit level, start to tamp the top of the concrete.
This will work the wet cement or ‘cream’ to the top and allow you to work a consistent and smooth finish. You may need to drag back some concrete as you work so your finished level is not above your edgings. This takes some practice but is quite fun and you will enjoy the process ‘very satisfying’. 
Step 15. Finishing. To get a consistent finish to the concrete vibrate and bounce your straight edge over the surface. As the concrete bounces angular particles will shuffle and become densely packed. This will make the strong cement cream come to the surface making it easy to work to a smooth finish.
Step 16. Curing. Make sure that nothing disturbs the concrete once you have a good finish. Cats should be kept inside for a few hours and make sure there is no rain in the forecast for at least 12 hours. Make sure all tools and edgings are clean of excess concrete so they do not stain.
Please note.
If you are concreting a garden path in summer make sure the concrete does not dry out too quickly. This can lead to improper curing and a weak, crumbly concrete. If you have to concrete in such conditions lay plastic under your path and make your mix slightly wetter. This will prevent moisture being drawn out too quickly disrupting the curing process.
Thank you for reading our article on how to make a garden path with concrete. How did you concrete path project go? Please feel free to comment below or email me questions regarding your particular project.
'As an Amazon Associate I earn from qualifying purchases'
This article contains affiliate links
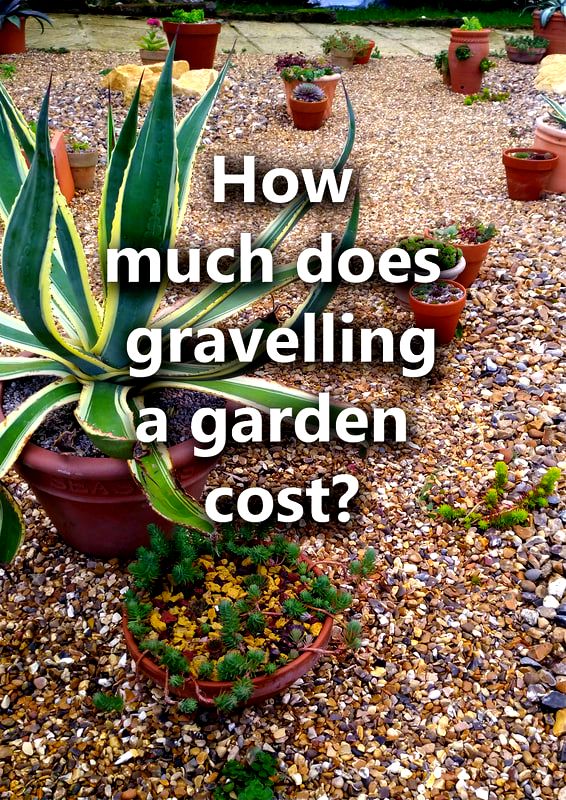
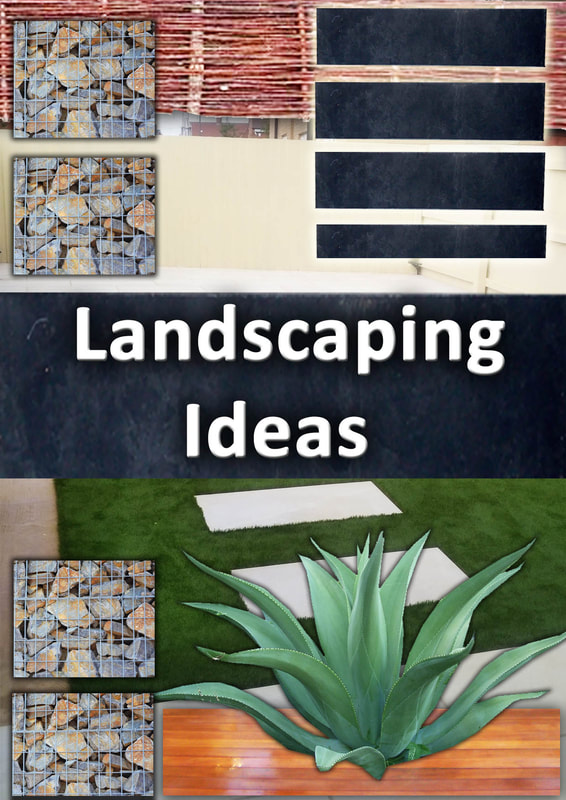
Gravel is one of the most diverse and versatile of all the garden surfacing materials. It comes in a wide variety of size grades, materials and colours. This makes it able to fit in with pretty much any garden style or theme. From contemporary and modern show gardens to rustic Tuscan courtyards, gravels aesthetic is universal. Not only is gravel visually effective it is also very affordable! Buying gravel and spreading at 40mm is five times cheaper per metre than buying new paving. Add to this the beneficial fact that gravel is also about 5 times faster to lay! 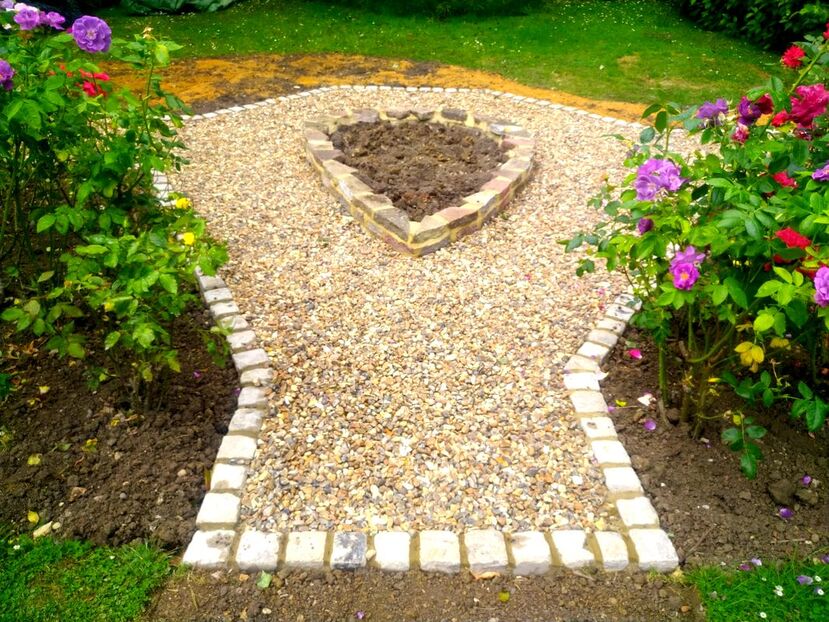
With no need for highly skilled labour, gravel can be laid by anyone well!
From a sustainability aspect gravel also scores well! Contextual aggregates can be sourced from local quarries reducing a gardens carbon footprint. Furthermore, lose gravels are permeable allowing storm water to pass straight through. This helps to reduce flash flooding and protect local watercourses. So, now you’re excited about gravel, I will show you how to make a gravel path! Can you lay a gravel path straight onto soil?
A gravel path really needs a sub base to stabilise the underlying ground. Gravel laid directly on to topsoil will eventually sink into the soft ground below. This means you will end up with a compacted and boggy mess full of weeds. 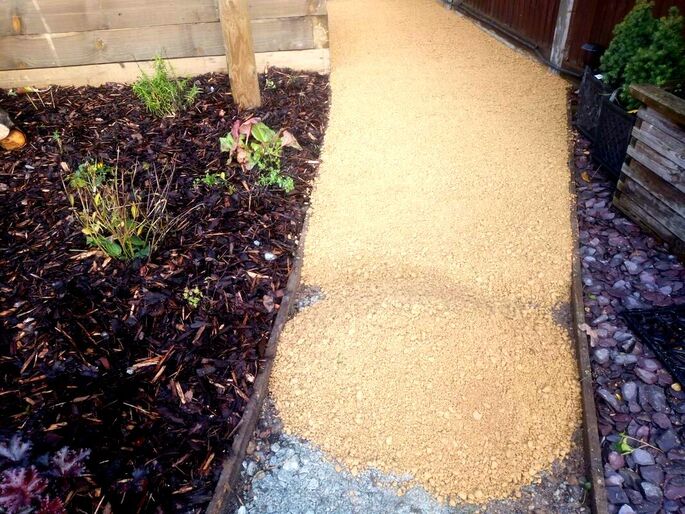
Do I need to dig before laying gravel?
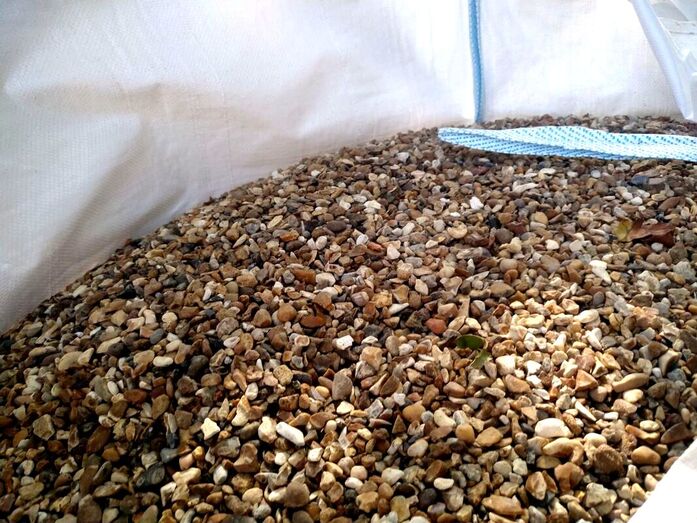
Ideally you should dig out a gravel path to a depth of 140mm. This will allow 100mm for a compactable hardcore aggregate such as type 1. It will also allow a 40mm depth of gravel. How deep should my gravel be?
I have found that a depth of around 40 mm is ideal for a gravel path. Too shallow and you will not hide the membrane and have the added risk of weed establishment. However, too deep and you will find the gravel challenging to walk upon. I find a 40mm depth allows enough displacement to kill geminating weeds but is comfortable to walk upon. What should I put under a gravel path?
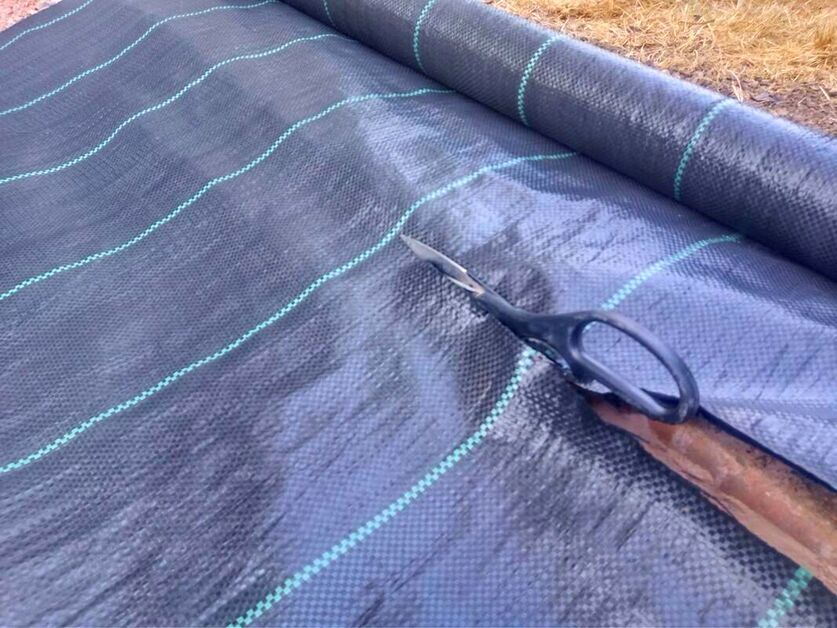
A gravel path should have about 100mm of compacted sub base aggregate for pedestrian traffic. The most effective and widely available is mot type 1, available from most builders merchants. On top of that you should lay a robust, landscape grade, membrane. This is to discourage weed establishment and gravel mixing with the sub base layer.
Should I put landscape fabric under a gravel path?
Often you see people putting landscape fabric at the bottom of a paths excavation. I think due to the fact many people assume weeds grow up through paths. Except for a few robust and woody perennials on the whole this is not true. If you excavate down 140mm you will be able to remove all threats of weeds growing under your path. Combined with at least 100mm of well compacted sub base your path will not be suitable for weed growth. Weeds more typically seed in the damp edges of shallow gravel. This is why I advise to lay your fabric on top of your sub base and under your gravel. 
How do you keep gravel on the path?
The best way to keep gravel on a path is by having suitable retaining edgings. Normally the wider and more stable the edgings the less gravel will escape. It is also important not to spread the gravel too deeply. This will encourage accidental kicking and scuffing of the aggregate as people walk. Sometimes the secret to keeping gravel on the path is the size of the aggregate. Very small aggregates are easy to pick up in the treads of shoes and easier to kick around. How to make a curvy gravel path?
To make a curvy path you will either; need to install flexible edgings or lay masonry edgings. These will allow you to shape the outline of your path with curves. The most typical flexible edgings are steel edgings like Everedge or long gravel boards. These can be fixed into position with pegs and mortar. Using small masonry units such as bricks, sets and blocks also allow you to form curved edging easily. When designing the curvy shape you can set your path out with hose pipe. This will enable you to visualise its shape before committing. The curvy shaped path can then be sprayed out or pegged. 
Do gravel paths need edging?
Gravel paths do really need some form of retaining edging to contain the aggregate. If you do not install edgings soil and dirt will infiltrate your gravel. This will lead to mud and silt filling up the aggregate and weeds becoming established.
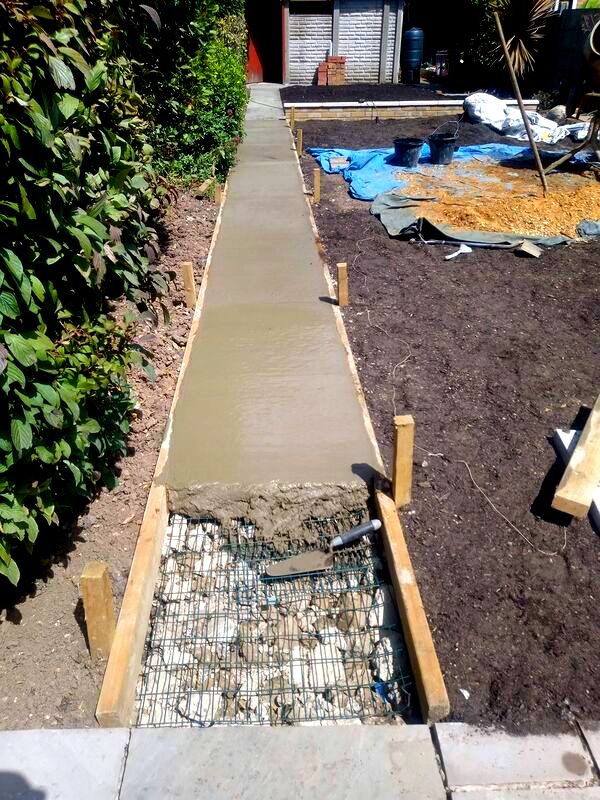
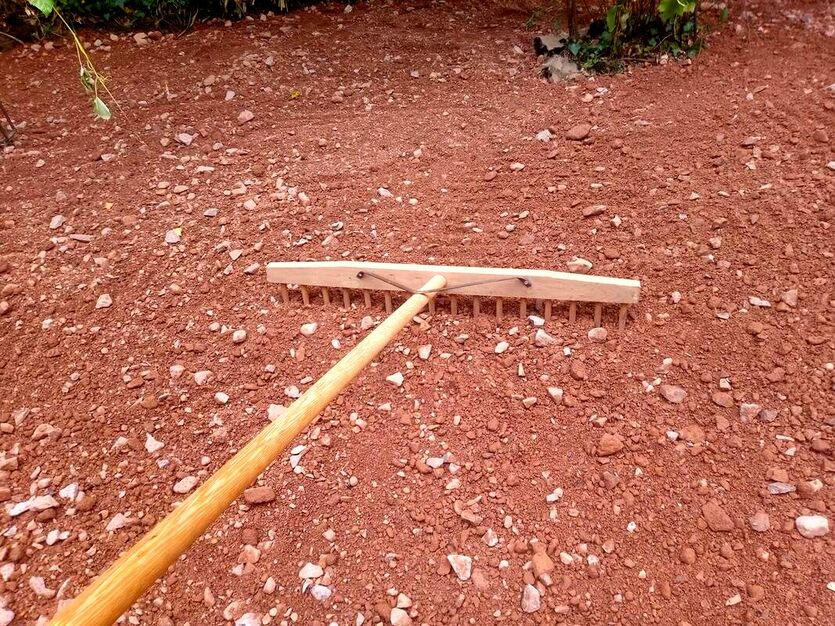
How to make a gravel path step by stepStep 1.
|


|
|
|
|
|
|
|
|
|

|
|

|
'As an Amazon associate I earn from qualifying purchases'
This article contains affiliate links
Gravel is one of the most versatile and decorative of all garden surface options. Not only does it come in a wide variety of materials it is much more affordable than other surfaces.
Unlike conventional paving gravel, does not require skilled labour to spread and lay. Spreading gravel is a much faster process than laying paving making it more economical and efficient.
Gravels come in various size grades which can create aesthetically, pleasing, visual, textures.
They also provide an opportunity to combine areas of seating and circulation with planting.
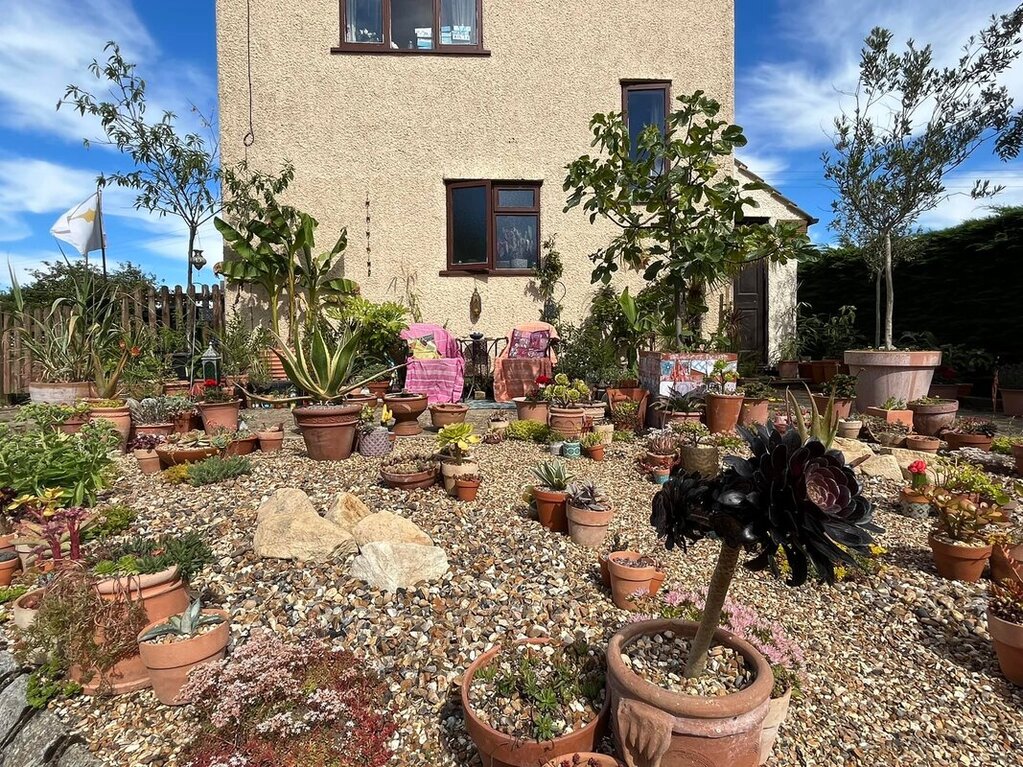
Our Moroccan, Desert garden with gravel seating in Missenden, Bucks
Gravel is also a more ecological surface allowing storm water to permeate back into the soil. This reduces the risk of flash flooding and the polluting of natural watercourses and wetlands.
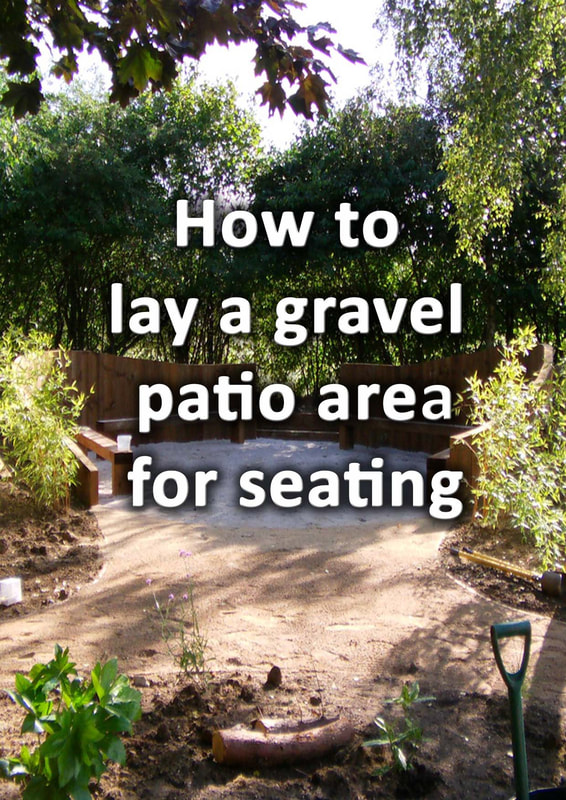
In this article I will answer some common questions about laying gravel within your garden. I will also explain how to lay a gravel patio area for seating correctly.
In this article I will answer some common questions about laying gravel within your garden. I will also explain how to lay a gravel patio area for seating correctly.
Do I need to dig out soil before laying gravel?
It depends if you intend to grow plants through the gravel or use the gravel as a path of patio. If you are using gravel as mulch for planting beds you will not need to dig out soil.
However, if you are laying gravel for human traffic you should excavate out at least 100mm of topsoil.
If you wish to lay gravel to a driveway you should excavate at least 200mm of topsoil.

Do I need a sub base for a gravel patio and seating?
For a gravel patio it is ideal to have a compacted sub base of between 75 -120 millimetres deep. The perfect depth will depend upon your soil type, surrounding trees and expected traffic volumes.
A well compacted and even sub base will ensure a firm and robust surface which will resist weed encroachment.
Do I need to put sand under a gravel patio?
Gravel by its very nature will displace and move under foot. Therefore you only want to spread materials under gravel which are stable.
This is why compacted mot type one is the best material for under a gravel patio. Sand will easily rutt and displace making your gravel surface unstable.
Sand also provides an easy root run for surrounding trees and shrubs. This can lead to bulges and undulation within the gravel surface.
Do I need to lay plastic membrane under a gravel patio?
It is always recommended to lay a robust landscape membrane under your gravel. This will act as a separation barrier between your sub base and gravel.
Separating the two surfaces will prevent sub base working its way up and infiltrating your gravel. Plastic membrane will also act as a root barrier preventing weeds encroaching upon your gravel patio.
What type of gravel is best for patios?
It is difficult to isolate any one type of gravel which is the best for patios. However the best aggregates will be ones which do not absorb moisture.
This will prevent algae and discolouration from microorganisms. Generally the best gravels will be graded between 10 -20 millimetres in size and compliment your gardens style.
One of the most commonly used and reasonably priced gravel is shingle gravel.
What tools will I need to lay a gravel patio?
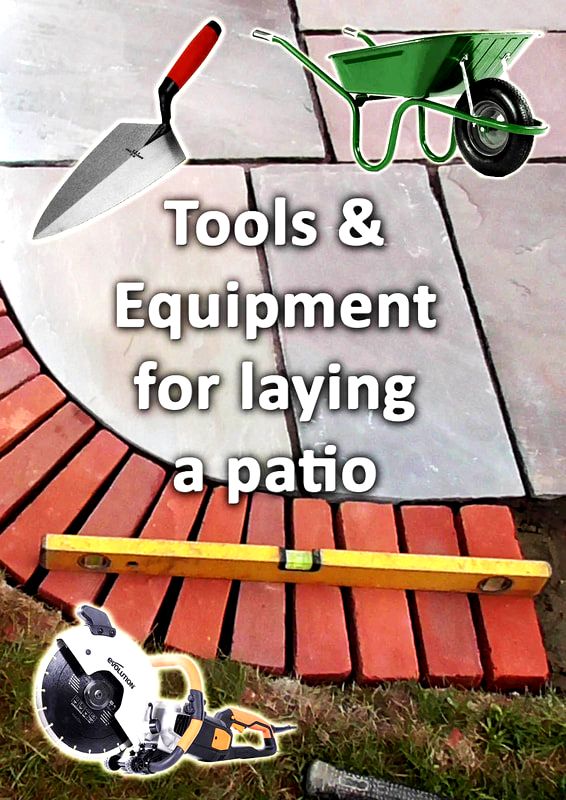
The great thing about laying a gravel patio is you do not need many tools; Usually a spade, shovel, spirit level and wheel barrow is enough.
You will probably need more tools to install your edgings than laying the gravel itself. The most common edgings for gravel are stainless steel, timber gravel boards and masonry.
Installing these will normally require brick laying tools, a sledge hammer and drills for fixing.
What is the best edging for a gravel patio?
The best edging for gravel will depend upon the design and style of the patio. For modern patios stainless steel is minimalist and effective.
For sheer durability and choice however I feel masonry materials are the best edgings for gravel patios. Materials like natural stone, brick and concrete blocks offer a strong and robust edging.
How to lay a gravel patio area step by step
Step 1.
Excavate out your new gravel patio or seating area to a depth of 140mm and dispose of the spoil. If you are removing soil from site you may want of fill up a skip with the excavated ground.

Step 2.
Install your patio edgings so the sub base and gravel can be contained. These may consist of stainless steel edging, timber boards, bricks, natural stone or concrete blocks.

Step 3.
Using pegs, peg out your sub base level. This will help you to achieve a consistent depth of gravel without too much displacement. Run a string line tightly across your gravel patio from the tops of your edging. Tap pegs in 40mm below the finished level, this will enable you to peg out a perfectly level base.

Step 4.
Supply and spread your hardcore, the best aggregate for this is mot type 1 compactable hardcore. With a wheelbarrow and a rake spread out your type 1 evenly to the top of your pegs.

Step 5.
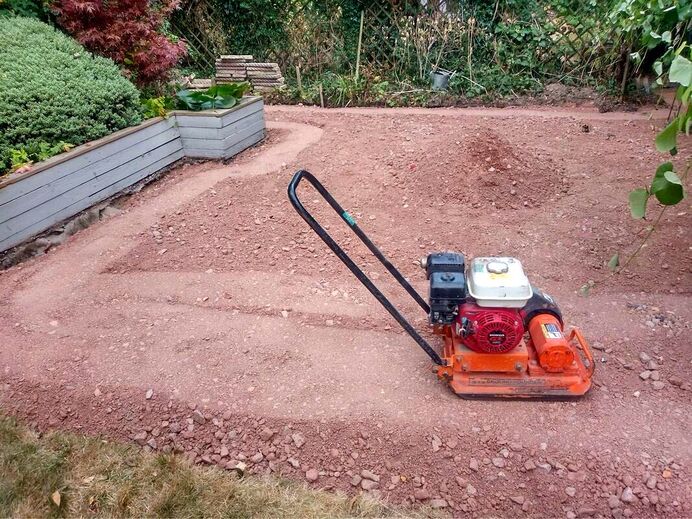
Compact your type 1 sub base with a vibro compaction plate. These are available to hire from most good hire companies.
Step 6.
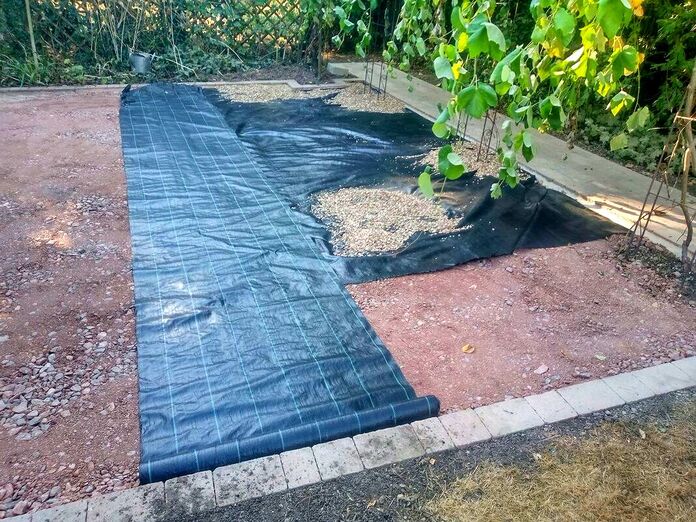
Apply a robust weed membrane to the surface of your sub base and fix it firmly into position.
Step 7.
Supply and spread your gravel to the top of your edgings and at an even level across your patio.
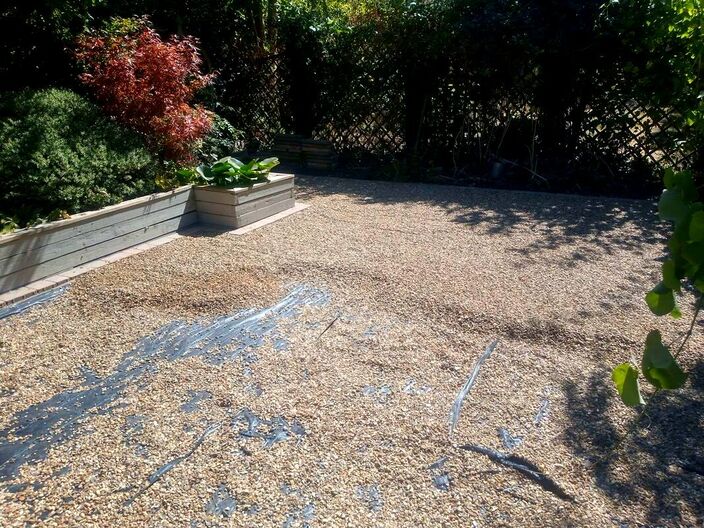
You have now completed laying your gravel patio and seating area!
3 Tools for laying a gravel patio


Spear & Jackson Landscaping rake (Amazon)
|
|
|
Thank you for reading our article on how to lay a gravel patio area. We hope you found it useful and have linked to some other relevant articles below.

|
|
|
|

|

|
|
|
|
|
'As an Amazon associate I earn from qualifying purchases'
This article contains affiliate links
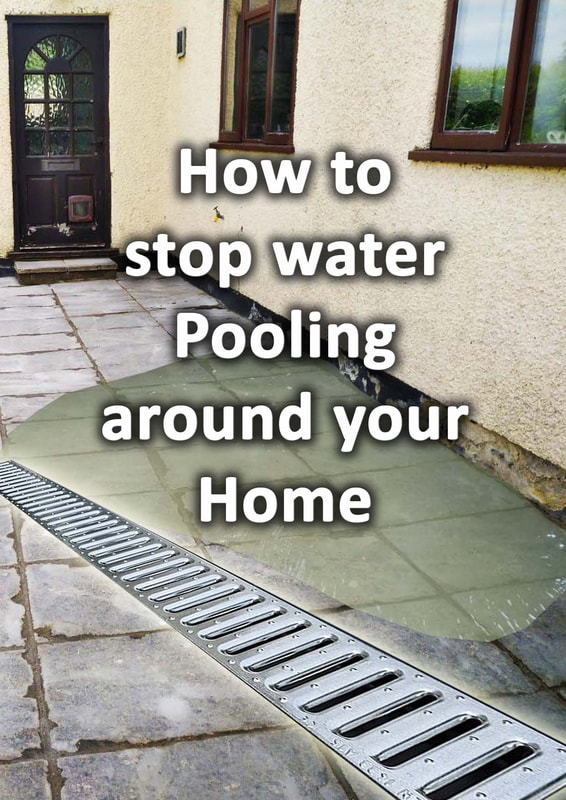
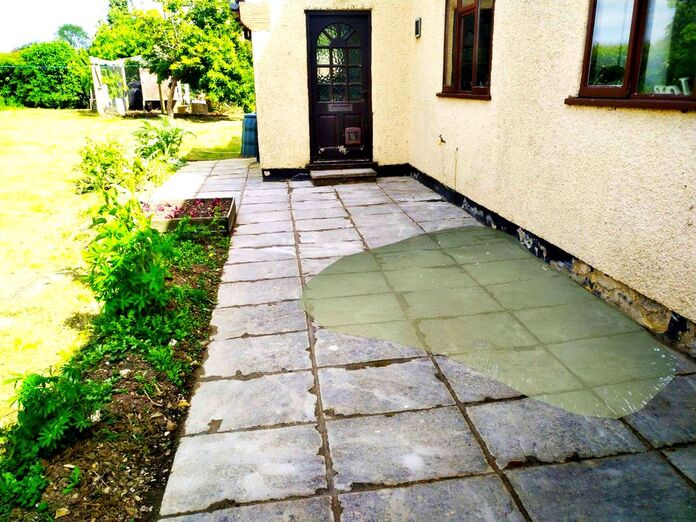
Water pooling against your homes walls and foundation is far from ideal. Excess water next to the home can lead to a variety of issues including; flooding, damp, mould, subsidence and cracks.
The subsoil around your home should have a relatively consistent moisture content throughout the year. Large fluctuations in the grounds saturation can lead to regular shrinkage and expansion.
Such action can eventually lead to the structural weakening of your home. Damp walls and foundations can be become victim to freeze and thaw damage. Such conditions can also lead to internal dampness and mould.
Consequently a thorough effort should be made to stop water pooling against your home. Here I will explain the best interventions to prevent water and moisture sitting against your walls.
Why you should stop water pooling against your home?
Water pooling around the home can increase the chances of flooding, damp, mould, subsidence and structural failure.
Water pooling around the home can increase the chances of flooding, damp, mould, subsidence and structural failure.
How to divert water from a house on a slope
If your home is on a slope or, at the foot of a hill it could potentially trap surface water. This can lead to water pooling against your house potentially causing negative circumstances.
Water not only flows along a landscapes ground level it can also travel under the surface. This can increase and exacerbate ground saturation levels around your property.
For this reason it is optimal to divert hydraulic flows around or away from your home.
Take a look at your property from numerous directs and angles. Try to get an idea of the surrounding topography and where surface water would flow towards your home.
This will help you to identify where to potentially block or divert ground water flows.
Ways to divert water from your home
Mounds
Mounds or 'bunds' are manmade embankments of soil designed to block and channel surface water. If your house is situated on a slope an arc shaped mound will divert water around your home. These mounds can become interesting landscape features planted with ornamental plants or aesthetically landscaped.
Swales
Swales are linear depressions within the landscape which collect and channel excess water. These can feed seasonal flooding wetlands or retention ponds at the lower contours of your property. Swales can be designed to collect ground water flowing towards your home and divert it elsewhere. Similarly to mounds, swales can also be designed to be pleasing landscape features. They can be based with pebbles and planted with decorative wetland pants.
Drainage channels
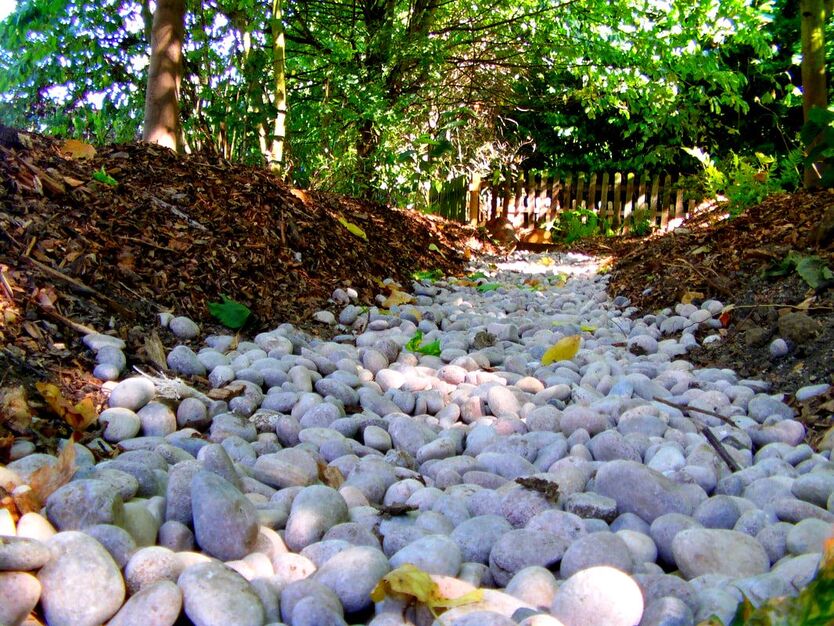
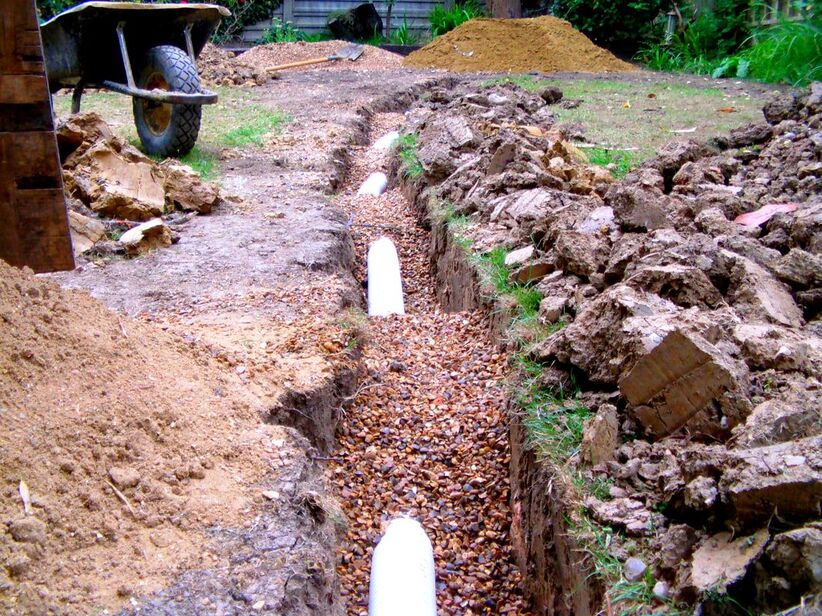
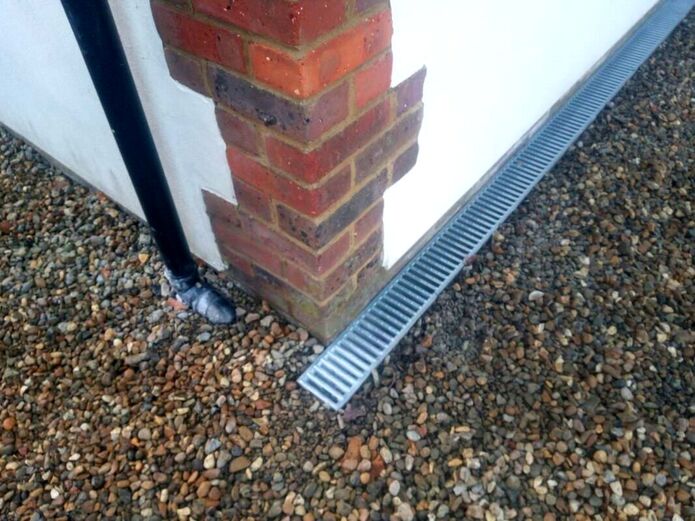
Drainage channels work in a similar way to swales but are engineered in a more direct way. These channels consist of a deep and linear trench filled with free draining gavel and a perforated pipe. The channel allows ground water to leach into the channels and be directed away. The channels can directly feed into a drainage feature such as a soakaway or wetland. Drainage channels can be installed along your homes boundary to collect and redirect encroaching ground water.
Ideas to stop water pooling against your house
Gutters
It is very common for roof gutters to become blocked with, dirt, moss and autumn leaves. This can lead to overflowing storm water running down the walls of your home. This excess water can pool around your home along sideways, patios and borders. To stop water pooling around your home make sure gutters, pipes and drains are clear of debris.
Leantos
Lean tos are covered structures which extend the shelter of the home outside. These pergolas like structures are very effective at keeping rain water away from the home. They can also create extra storage space, log stores or greenhouses.

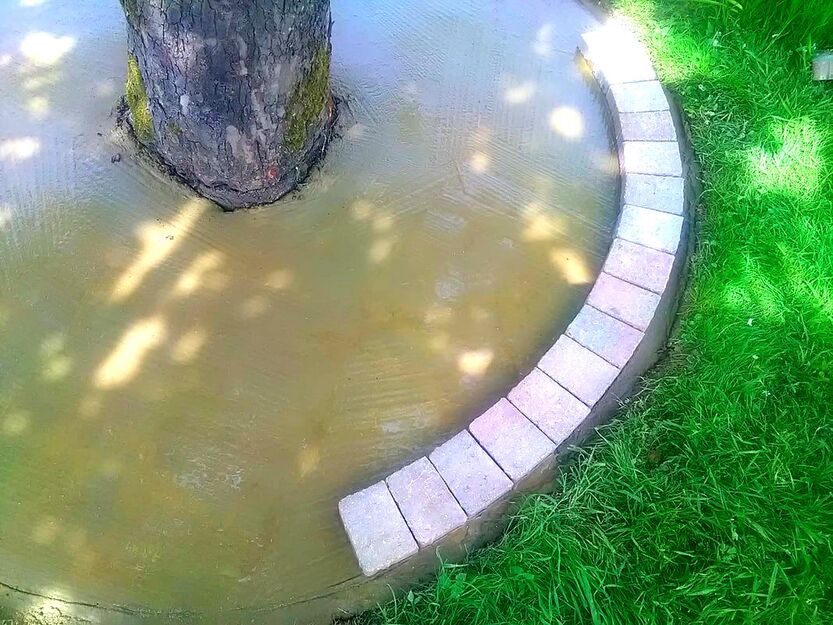
Surfacing falls
A typical cause of water pooling against a home is badly laid paving and incorrect surface falls. All surfaces around the home should run ‘away’ from the building.
Furthermore, there should be no bellies and troughs in the surface which hold standing water. If your local topography does slope towards your home you must implement a drainage strategy.
This will normally take two forms; Drainage chambers installed along the building or a surface, back fall from the home. Both scenarios will channel collected water into a drainage network or soakaway feature.
Resurfacing around your home with gradients which fall away will stop water pooling around your home.
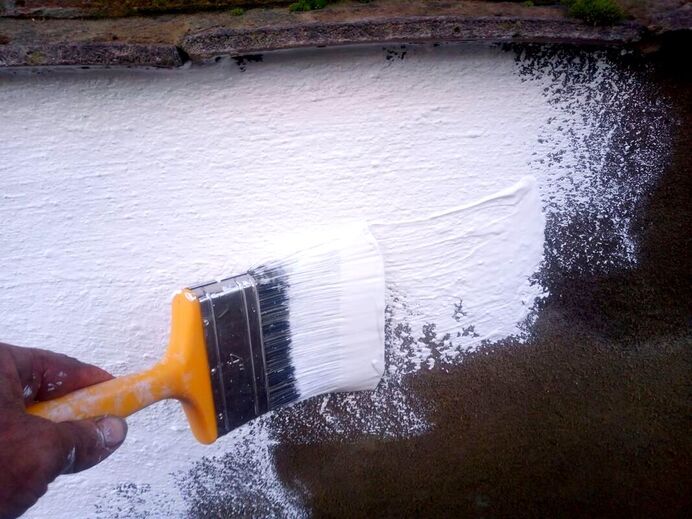
Sealants
If your property is surrounded by old brickwork and concrete it is likely it will naturally absorb water. As these materials age, they become less impervious and more absorbent.
Therefore, it is a good idea to consider sealing them with a weatherproof sealant. These can be rolled or painted on with a large paint brush.
It is often best to do this during the summer when the surfaces are dry. If they have lots of dirt and algae ground in they will also need to be pressure washed first.

Paints
Paint is also an effective way to add extra protection from water around your home. Very much like sealants paints add a protective and impervious barrier to moisture. You also have the option to coat concrete pathways and sideways around the house with concrete floor paint. These can not only repel water but bring new life to old surfaces.

What are better permeable or impermeable surfaces around home?
If you are worried about water pooling against your home impermeable paving will be better than permeable. The ecological and sustainable credentials of permeable paving are hugely over exaggerated, especially for residential gardens!
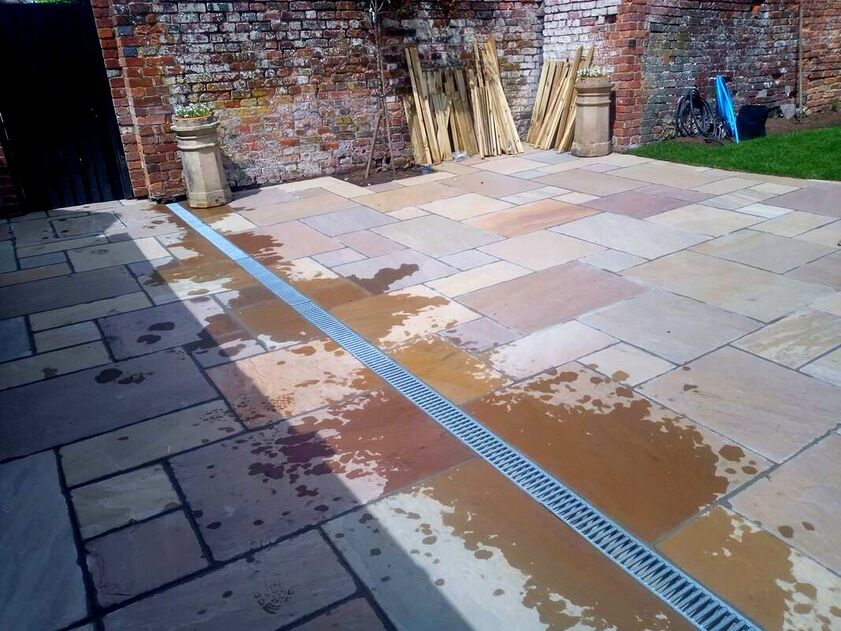
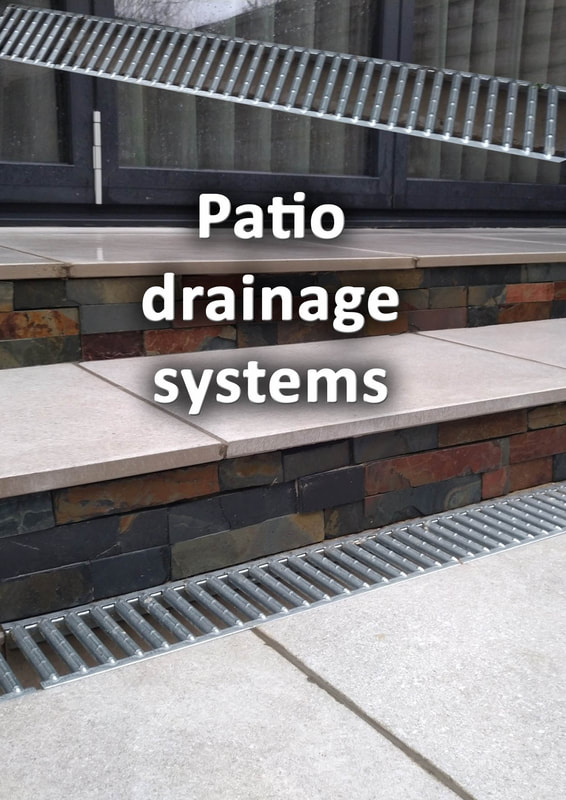
One of our patio drainage systems with porcelain paving
It is actually more sustainable to install impervious paving with drainage channels plumbed into ecological wetlands. These can be small ditches and swales planted with wetland plants. This way, you can drain water away effectively and create wildlife habitats at the same time.
You are still allowing water to be reabsorbed into the soil naturally while keeping your homes structure dry. Seasonal flooding wetlands and drainage swales are much more sustainable than permeable paving.
You are still allowing water to be reabsorbed into the soil naturally while keeping your homes structure dry. Seasonal flooding wetlands and drainage swales are much more sustainable than permeable paving.
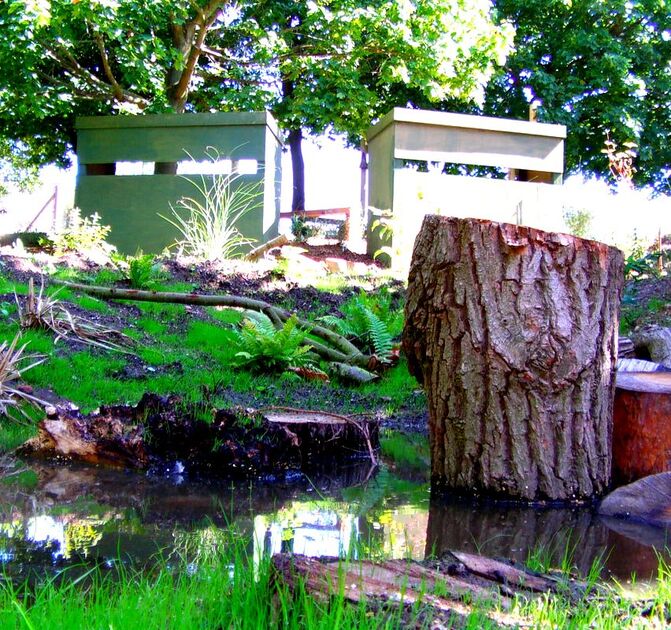
One of our seasonal flooding drainage wildlife ponds
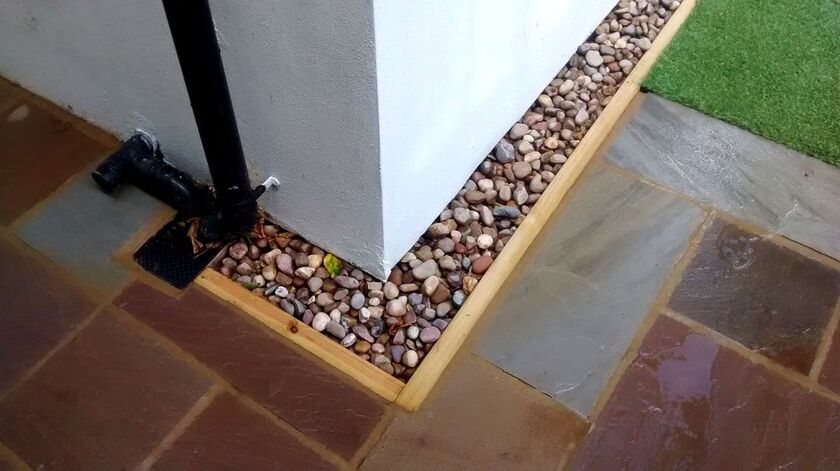
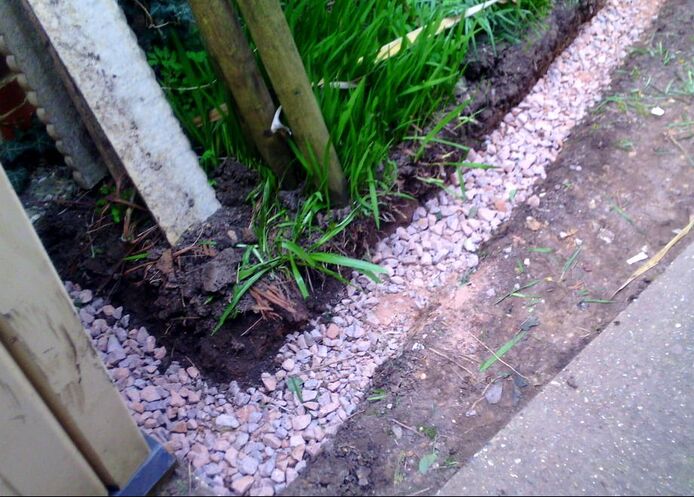
Should you put gravel around your house for drainage?
A very typical thing you see around some paths and patios is a gravel trap. These are implemented where the building meets a hard surface such as concrete or paving.
Although they will help to drain excess water away they are not the best option. If water is sitting against your home you are much better off capturing water separately than it travelling along your walls.
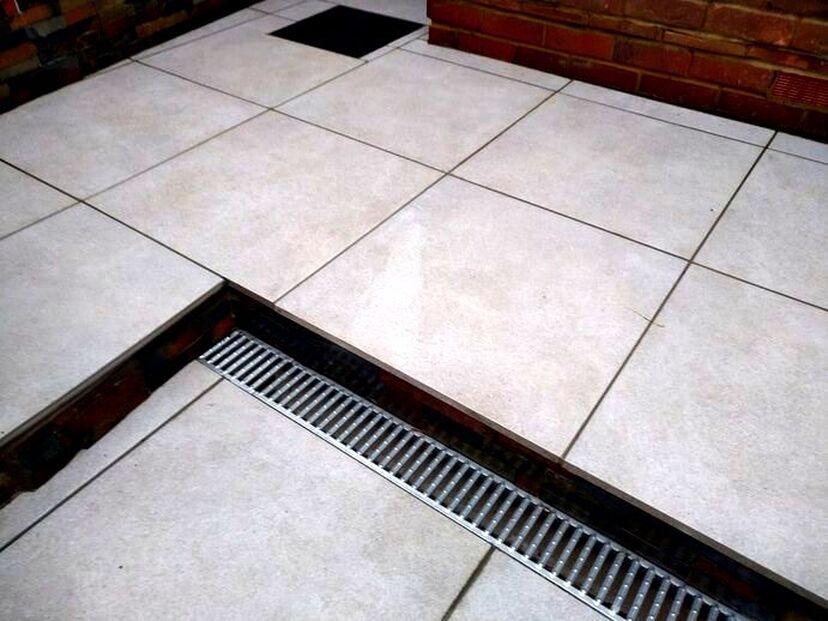
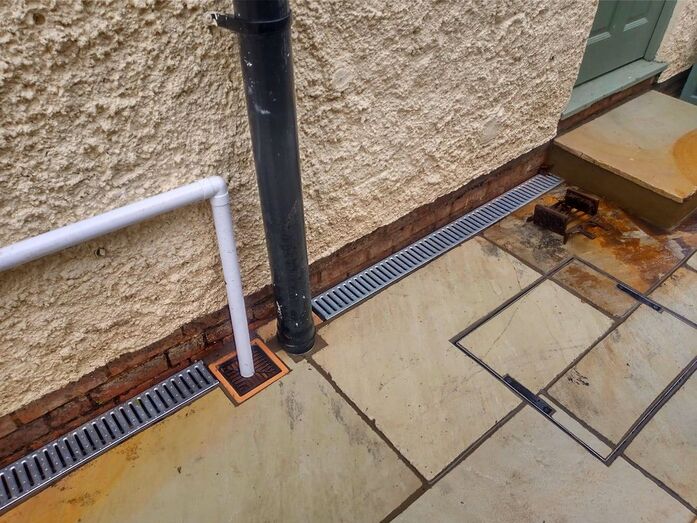
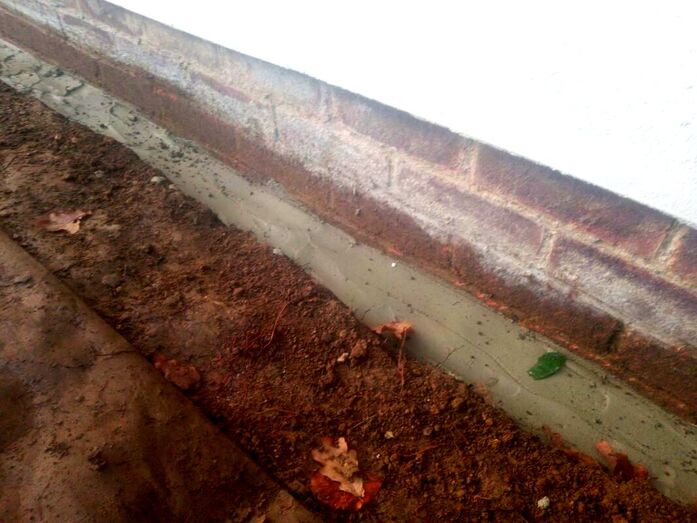
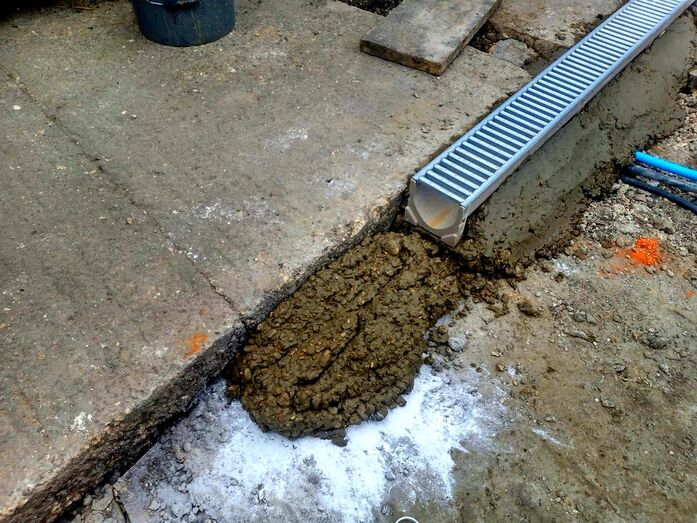
This is best done with a grated, channel drain or Acco chamber. These can then be plumbed into a garden drain or soak away.
If you have to create a gravel pea trap make sure you render it with waterproof mortar. I would also recommend painting the channel with two coats of bitumen paint before filling with gravel.
If you have to create a gravel pea trap make sure you render it with waterproof mortar. I would also recommend painting the channel with two coats of bitumen paint before filling with gravel.
Install a channel drain which feeds into a drainage feature.
Whether you choose to collect water against the home or a patio, channel drains are an effective solution. These grated channels can collect surface water and transport it away efficiently.
If you are thinking of installing a grated channel drain why not read our step by step article here. Alternatively read our step by step guide on installing an acco drainage chamber below.
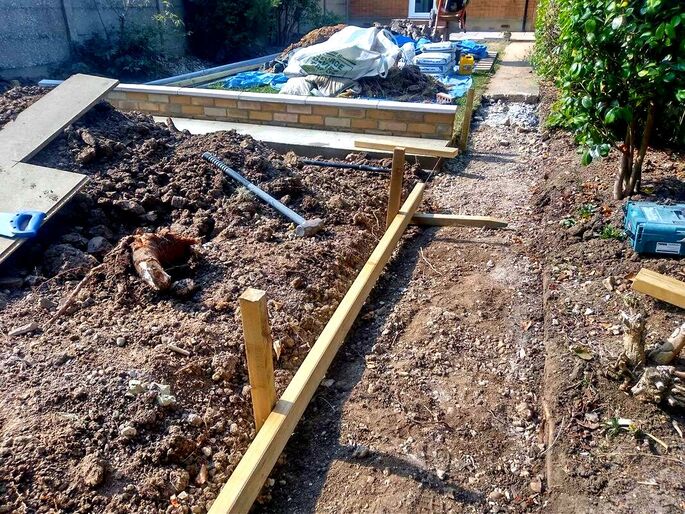
How to install acco chamber channel drains step by step
Below is a case study of a recent drainage project we undertook in Buckinghamshire.
The client had water pooling against the home and was worried about flooding and damp. The existing driveway was a loose gravel drive which had become saturated and compacted.
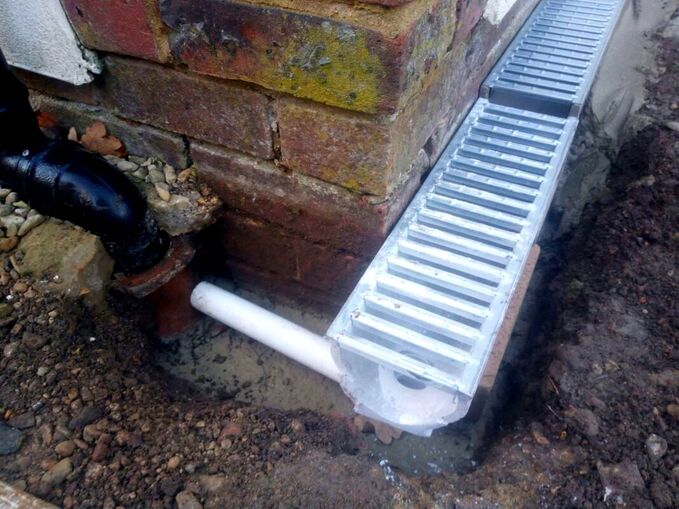
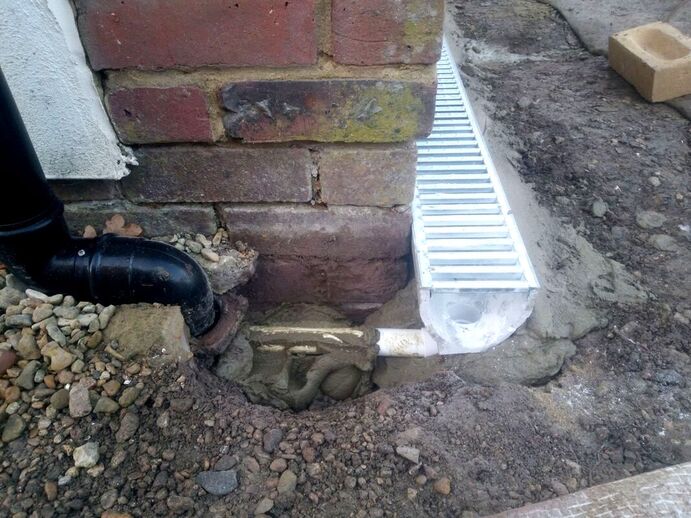
I excavated a channel along the home and installed, concrete, acco chambers plumbed into a soakaway. The Acco chambers have a stainless steel grill which has a neat and contemporary finish.
Below is a case study of a recent drainage project we undertook in Buckinghamshire.
The client had water pooling against the home and was worried about flooding and damp. The existing driveway was a loose gravel drive which had become saturated and compacted.
I excavated a channel along the home and installed, concrete, acco chambers plumbed into a soakaway. The Acco chambers have a stainless steel grill which has a neat and contemporary finish.
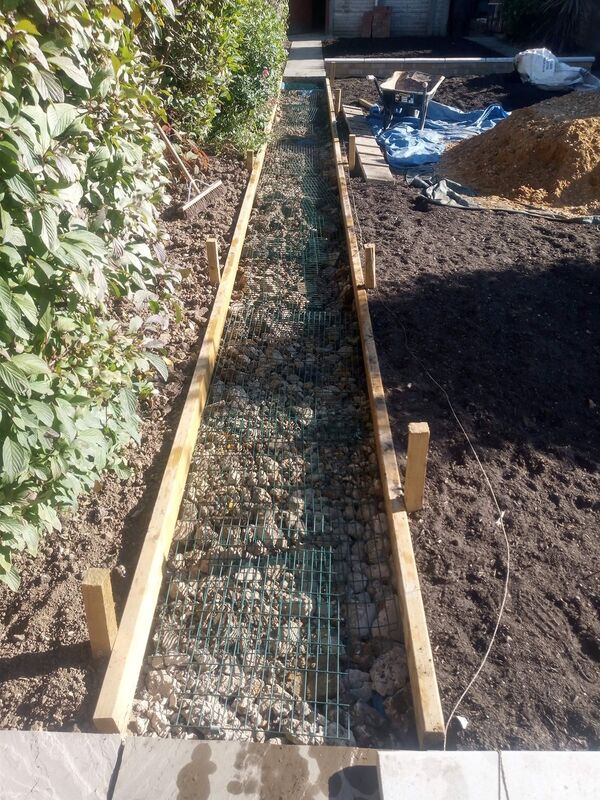
Step 1:
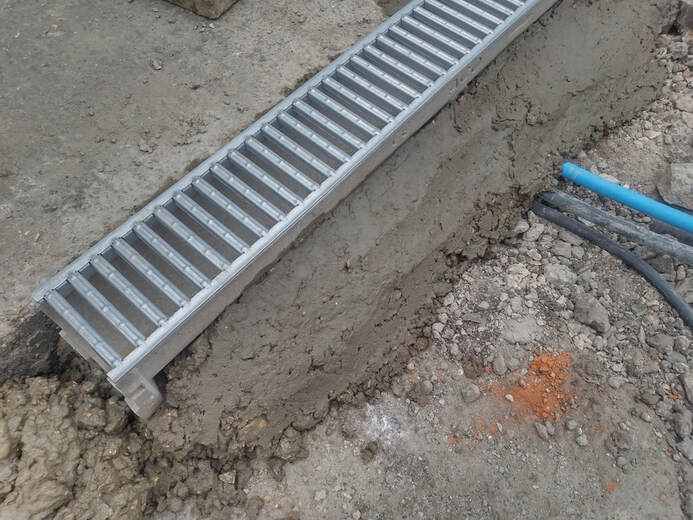
Excavate a trench along the home wide and deep enough to set in acco chambers bedded on mortar.
Step 2:
Examine the ground under the excavation. If it is soft and moves under pressure you will need to excavate out a little more. Dig until you reach thick and compacted subsoil which does not displace.
Step 3:
If you have excavated lower than 40mm below the bottom of the chamber, fill up the void with compactable hardcore. The best aggregate for this is mot type 1. Spread this evenly and compact with a hand tamper.
Step 4:
At this point it is a good idea to mark your finished height for the top of the chamber on your wall. If you are not laying against a wall set up a string line to work to.
Step 5:
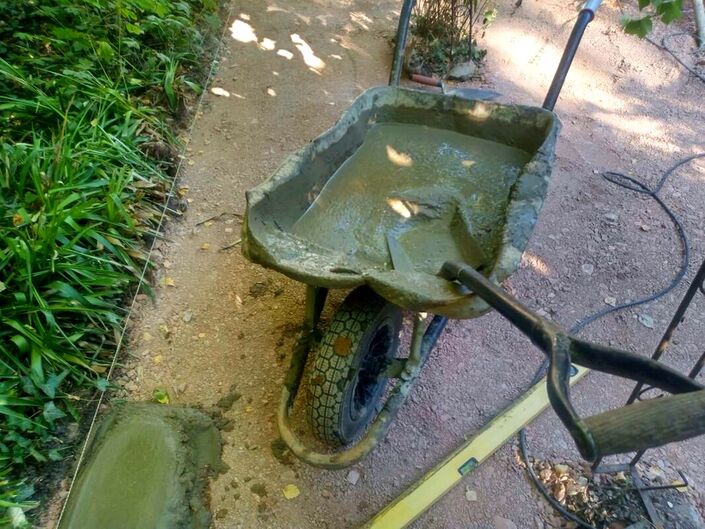
Mix 4 parts sharp sand to 1 part cement in a cement mixer until it becomes a thick, brick, laying, mix. When mixing the mortar add a couple of cap full’s of mortar plasticiser.
Step 6:
Lay an even bed of mortar along your chamber route. Work in peaks and folds so you can bed down the chambers gently.
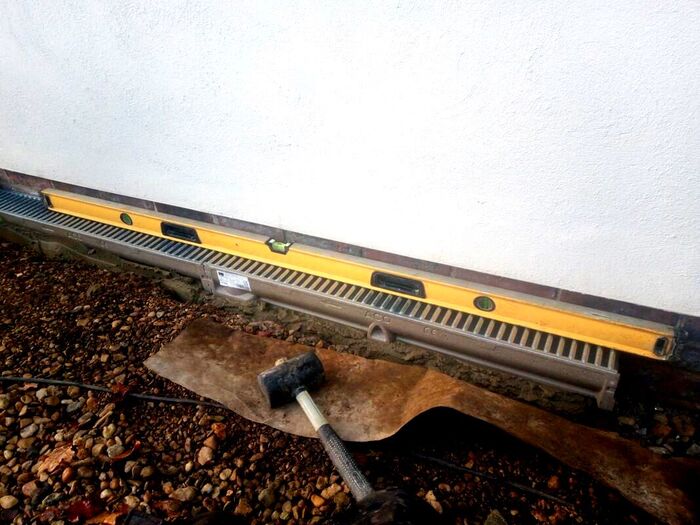
Step 7:
Bed down your first chamber carefully to the correct level you want. Also watch your level across the width of the Acco chambers, these should not be at a gradient.
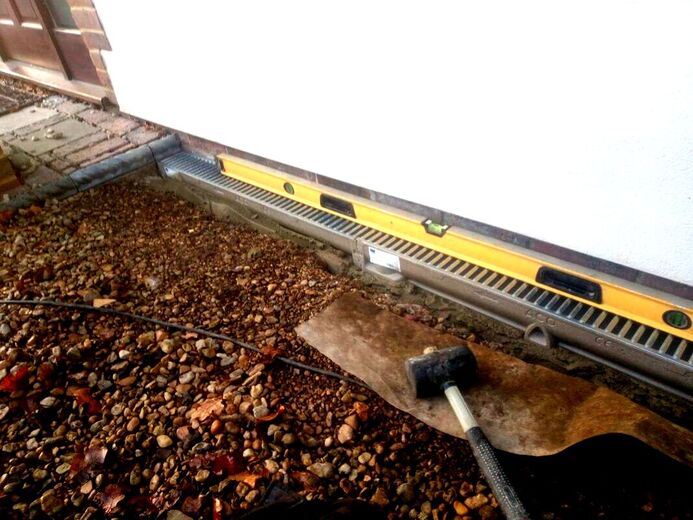
Step 8:
Acco chambers come with connection slots at each end so they connect tightly. Try not to bed too much mortar under these joins as it can prevent them connecting tightly.
Step 9:
Bed the chambers down one at a time checking your levels as you go. As the chambers start to set, point some mortar around the edges to hold them in place securely.
Step 8:
If you need to block off one end of the chamber, place a brick inside the channel. Then render a triangular mortar haunch up to the top of the chamber. When the mortar starts to set remove the brick and clean up the flat mortar edge with pointing.
Step 9:
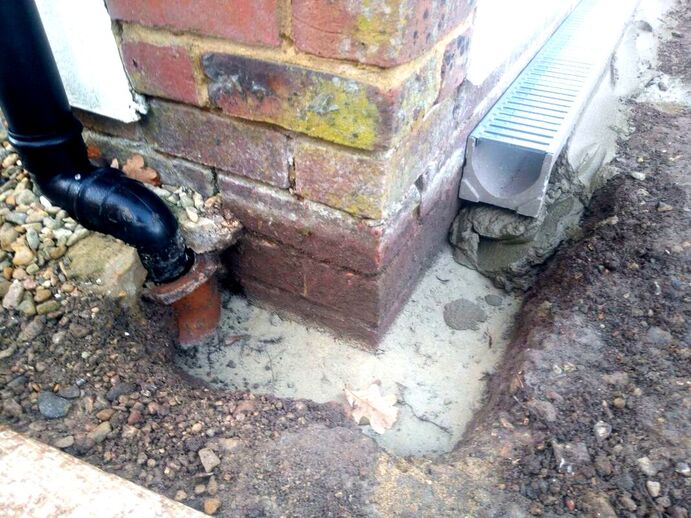
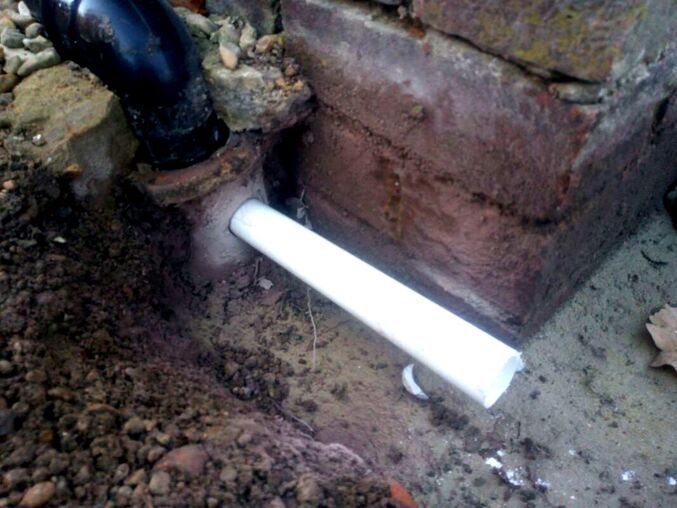
You will need to plumb your chambers into some form of drainage feature. This will normally be a drainage network or a soakaway. In this example we plumb into the gutter down pipes of the house. These lead to larger soakaways at either side of the property. First, you must identify the part of your chamber closest to the outlet. If you also need to install a garden drainage soakaway visit our step by step guide here.
Step 10:
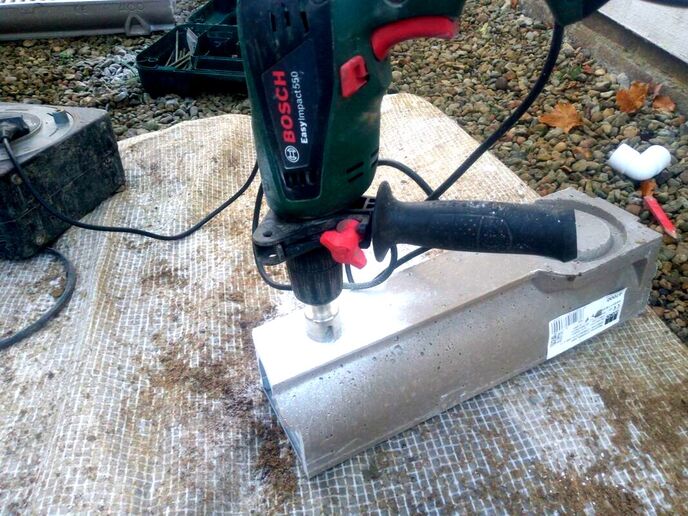
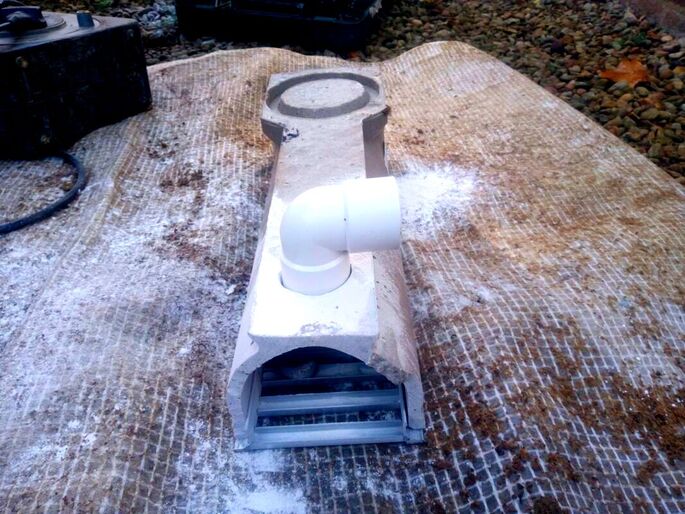
Cut out a circular hole to the base of the chamber where the drop outlet is to go. This can be done with a circular diamond coring bit. If your coring diameter is too small you can gently rotate it inside the hole to cut wider. Fit a 35mm PVC pipe elbow attachment to the drop hole at the base of the chamber.
Step 11:
Fit a pipe from the elbow attachment to the destination pipe. You will have to cut another hole into the outlet pipe. Like before make this as neat and as tight as possible.
Step 12:
Identify where your outlet pipe will enter the destination pipe and mark a circle where the cut needs to go.
Step 13:
Cut a neat hole into the destination pipe with a power drill.
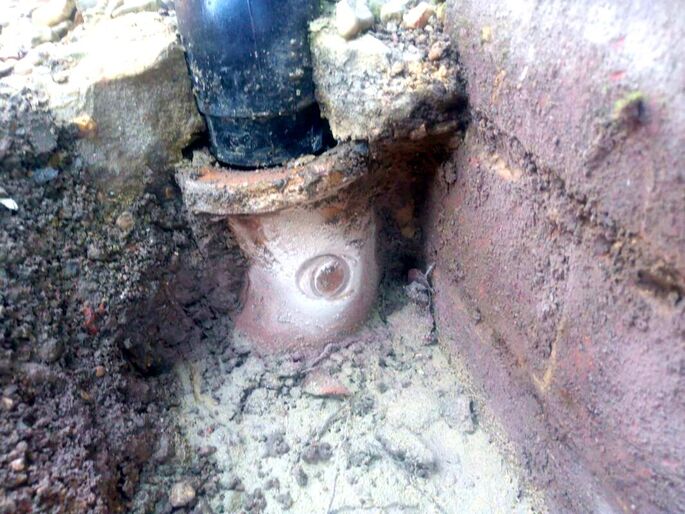
Step 14:
Make sure the pipe fits into the destination drain at an angle to fit the Acco chamber elbow connector.
Step 15:
Connect all the pipework together while laying the last section of Acco chamber on Mortar. This last bit is a little tricky, but is easily achievable with a little persistence.
Step 16:
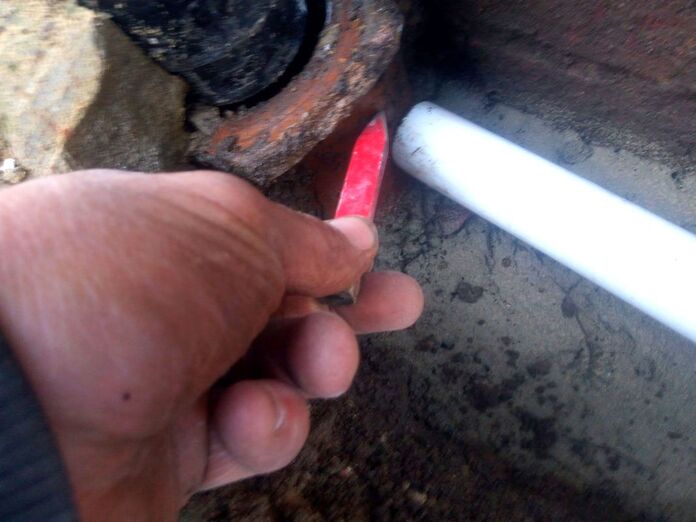
Seal up any holes, cracks or gaps with an external grade sealant such as silicone. Larger voids can be wrapped tightly in DPC Membrane and sealed with waterproof mortar.
Step 17:
Once the pipe work is sealed, encase it within mortar so future excavation doesn’t disturb it.
Step 18:
Re-grade aggregates and finish surfaces around the chambers. After 24 hours you can then test your chamber with buckets of water to watch them drain.
You have now completed your Acco chambers and stopped water pooling against your home. Below we have included some other, relevant articles, you may find useful.
|
|
|
|
|

|
|

|
|

|
|
|
|
|
|
|
'As an Amazon associate I earn from qualifying purchases'
This article contains affiliate links
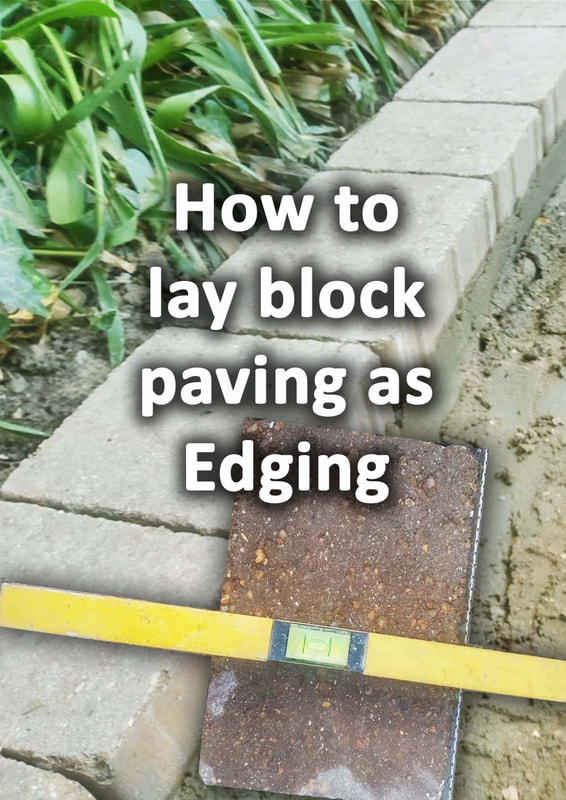
Block paving has become a familiar sight as one of the most popular driveway surfacing materials.
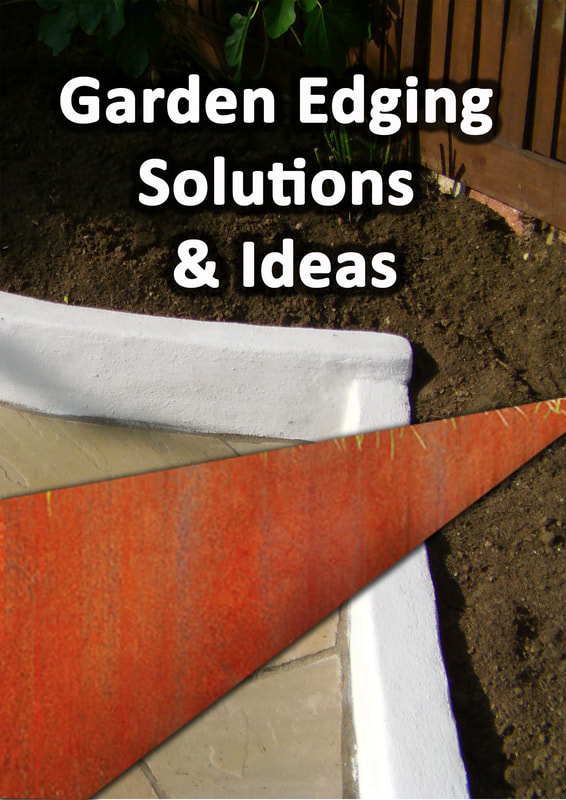
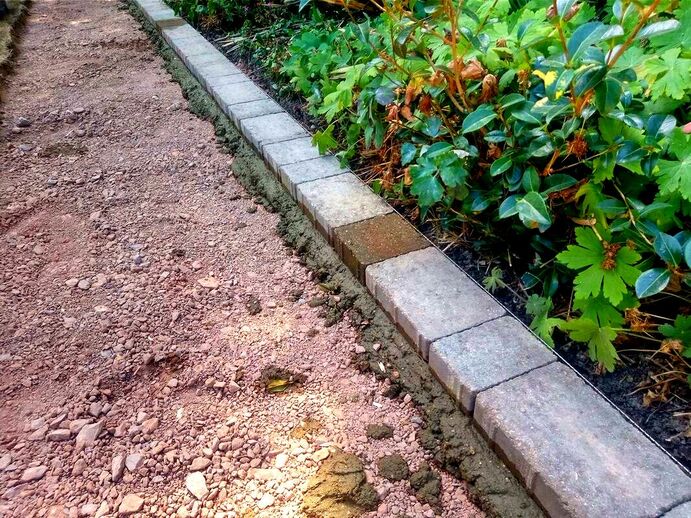
However, block pavers have also become well known for their numerous, other, landscape uses. One of the most favoured ways is using block paving as garden edging. In this article I will show you how to lay block paving as edging on mortar step by step.
However, block pavers have also become well known for their numerous, other, landscape uses. One of the most favoured ways is using block paving as garden edging. In this article I will show you how to lay block paving as edging on mortar step by step.
Can you use block paving as edging?
Block paving by its very nature is intended to be an effective edging material. When block paving is laid, perimeter blocks are mortared in to create a robust and strong edging.
This enables screeding sand to be retained and compacted under pressure. Block paving is designed to have a continuous and consistent width. This makes it very effective to lay as garden edging which is flush with surrounding surfaces.
Its uniform width and smooth surface makes it perfect for edging paths, flower borders and mowing edges for lawns.
Benefits of using block paving as edging
A main benefit of using block paving for edging is it comes in a wide variety of sizes and colours.
Each unit is easy to handle and is relatively affordable compared to other materials. Block paving is made using concrete with dense aggregates and colour dyes.
This makes it extremely durable and resistant to freeze and thaw degradation like traditional bricks. Blocks are easy to cut to shape making them a very versatile garden edging material.
What is the best mortar mix for block paving edging?
Very similarly to conventional paving, block paving edging is laid on a mortar bed of about 40mm.
This means the best mortar mix for laying block paving edging is 4 parts sharp sand to 1 part cement. The mix should have enough water content to create a good suction, seal with the blocks.
However, the mix should not be so wet that it does not heap up on a trowel. It is a good idea to add mortar plasticiser to the mix to make it as workable as possible.
The base of block paving can be very smooth and a little impervious. Therefore, a little Exterior Waterproof PVA added to the mix can increase its bonding potential.

Can you create curves with block paving edging?
To create curves with block paving you have two options: the first option is to use the smallest block pavers butted up together.
Each paver can be slightly angled to create a gradual curve over distance, like in the image below. Typically you would use the smallest block of the typical driveway 3 sizes packs.
These sizes can be purchased individually in large, retail packs like the Marshalls tegula 120x160x60mm blocks.
The second option is to cut small angles to the blocks you want to curve. The best way to do this is to lay your edgings to a curve leaving out every other block.
Make sure the distance between the furthest corners is the same width as a block. Then hover a block over the gap with its corners neatly between the adjoining blocks corners.
Make sure the distance between the furthest corners is the same width as a block. Then hover a block over the gap with its corners neatly between the adjoining blocks corners.
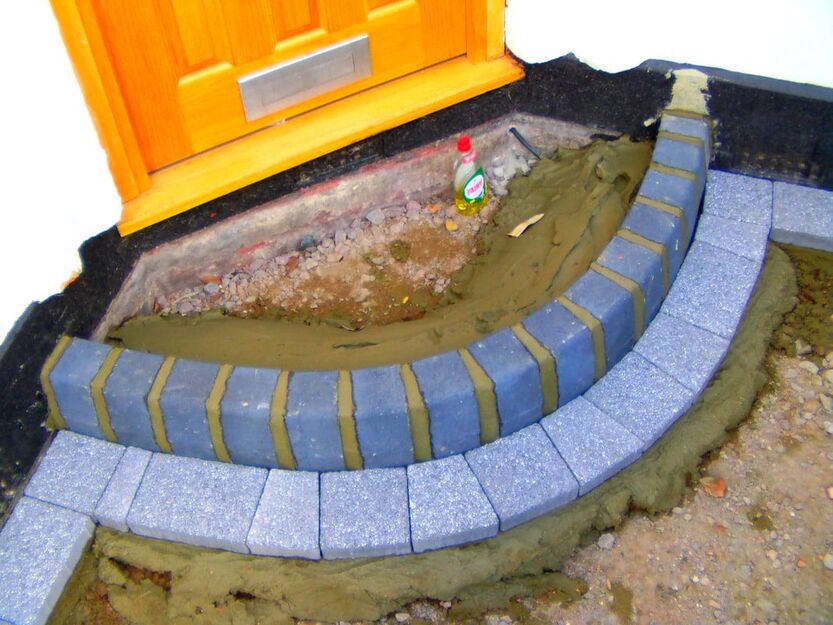
You can then mark and cut each side of the infill block, both cuts will resemble a narrow triangle. The infill cut should then neatly fit in between the two whole blocks like in the example above.
When continued over distance this can create a very attractive and consistent curve to block paving edging.
When continued over distance this can create a very attractive and consistent curve to block paving edging.
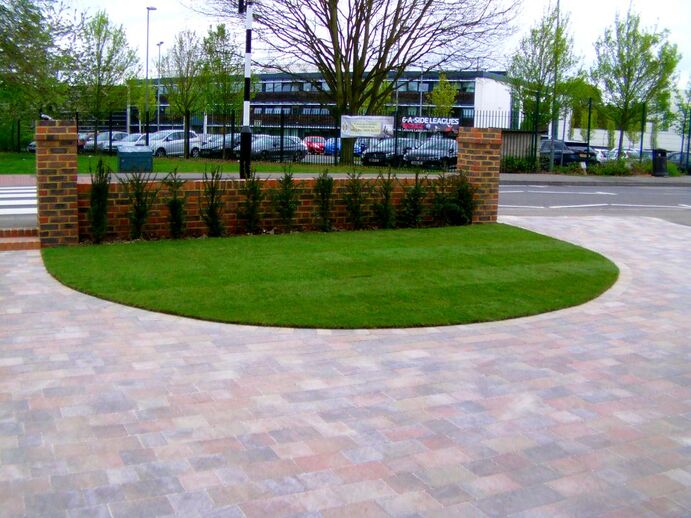
One of our block paving projects with curved block paving edging
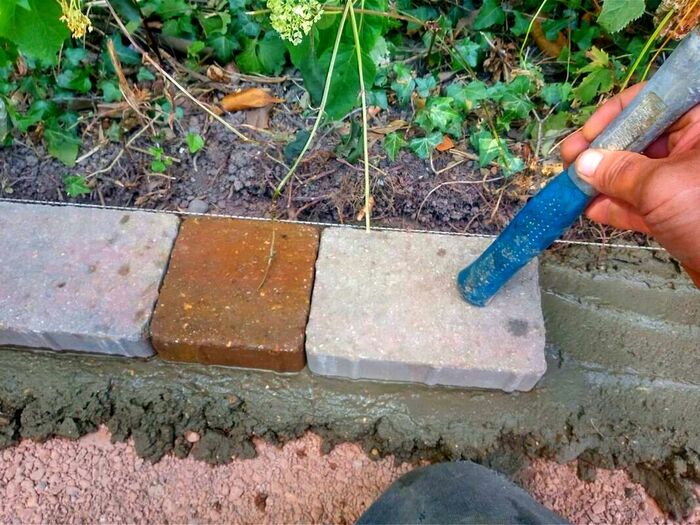
How to lay block paving as edging step by step
Step 1.
Mark out the route and placement of your block edging. This can be done with pegs, marking spray or rope.
Step 2.
Excavate out the soft, topsoil layer where your edgings are going to be situated. Dig out a little wider than the width of your blocks and to a depth of around 160mm deep from your finished level. Try to make your excavation as square and consistent as possible with no loose soil left within the trench. You may be surprised by how much soil you remove while excavating!
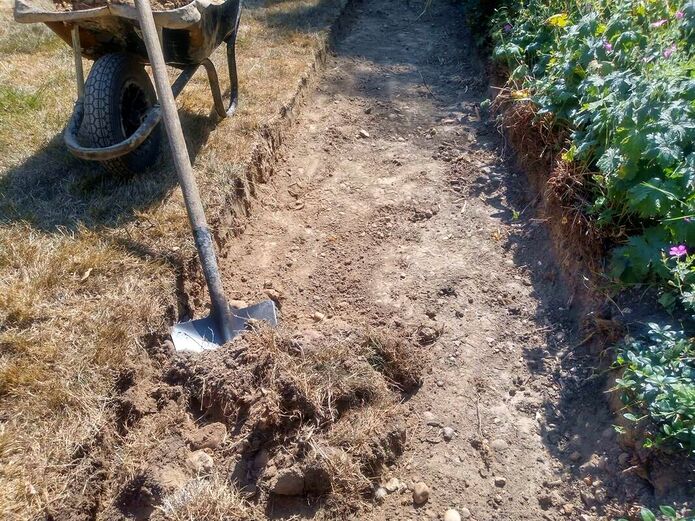
Soil bulks up by around 30% when digging out so factor this into your waste calculations. An ideal scenario would be utilising the soil elsewhere, if not you will have to remove it from site. Why not read our article on how to remove soil from your garden. If you wish to skip it read our article on how to fill a skip with soil here.
Step 3.
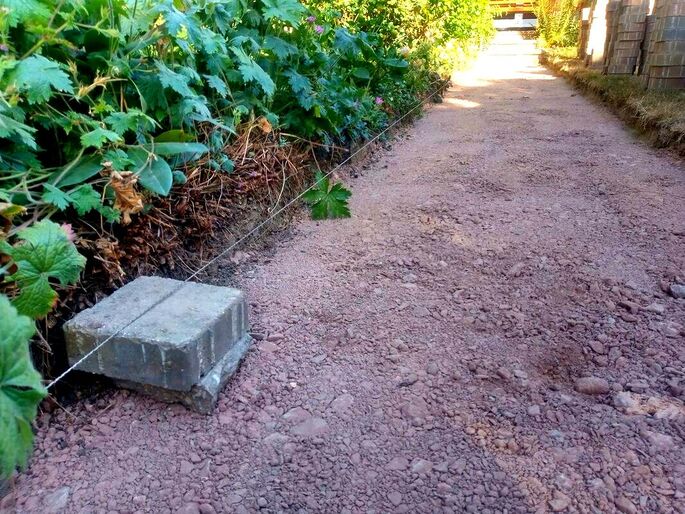
Work out the finished level you want your block paving edgings to be. This is so you do not excavate too deeply when digging out for the edgings sub-base. Most of the time you will want a flush and constant level across the path of your edgings. To achieve this run a tight string line from each end of your destination levels. Pegs can then tapped in to mark this finished level of your wearing surface.
Step 4.
You now have neat and linear trenches; these are the perfect void for your edging build up. You will need to scatter a 60mm layer of loose and compactable hardcore to the base of your excavation. The best aggregate for this is mot type 1, commonly available from all builders’ merchants. To work out how much you need you will need to times the excavations width x depth x length.

For example, if your edgings are 160 millimetres wide, 20 metres long with a 60 millimetre type 1 layer your calculation would be:
0.160 x 0.060 x 20 = 0.192 cubic metres of Type 1
Which works out at about 300 kilograms of type 1 hardcore, therefore, you will need 12 (25kg bags) of Mot type 1. 25 Kilo bags of mot can be bought from well know builders stores such as Wickes. For larger 850kg quantities it is better to buy this in jumbo or bulk bags.
Step 5.
When your mot compactable hardcore has been spread within your excavation you will need to compact it. This can be done using a tamper or if you do not have access to one a sledge hammer also works well. Tamp the type one down until it is well compacted and bites into the soft ground below. A good way to compact to a consistent level is to peg out your completed type 1 level. The sub base can then be spread a little higher than the pegs so it compacts flush with them.
Step 6.
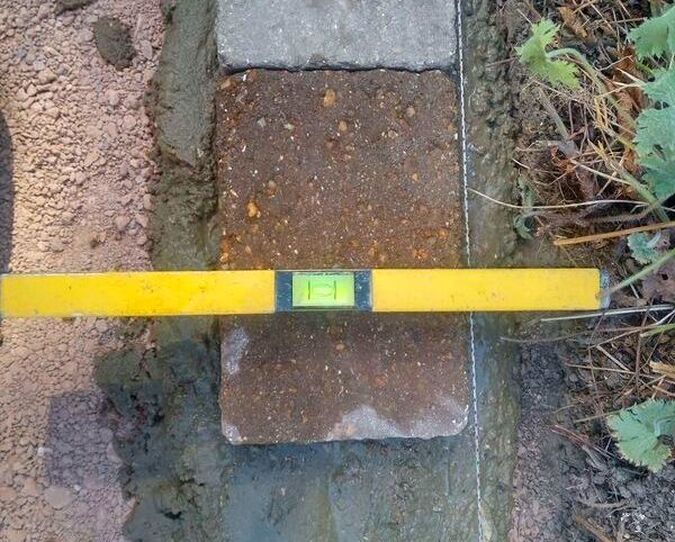
You are now ready to lay your edgings on cement mortar! If you need to lay to a consistent height, set up a tight string line! If you are laying to an existing, adjacent level like a lawn you can do this by eye. However, it is advised to use a level or straight edge to flush up blocks as you lay.
Step 7.
Mix up your mortar; you will need to mix 4 parts sharp sand to 1 part cement. This is best done in a cement mixer for a consistent mix. It is advised to add plasticiser to the mix to make your mortar more workable.

Step 8.
Spread out a consistent depth of mortar across the compacted hardcore. Using a trowel, create ripples and peaks to allow the mortar some give when tapping blocks level.
Step 9.
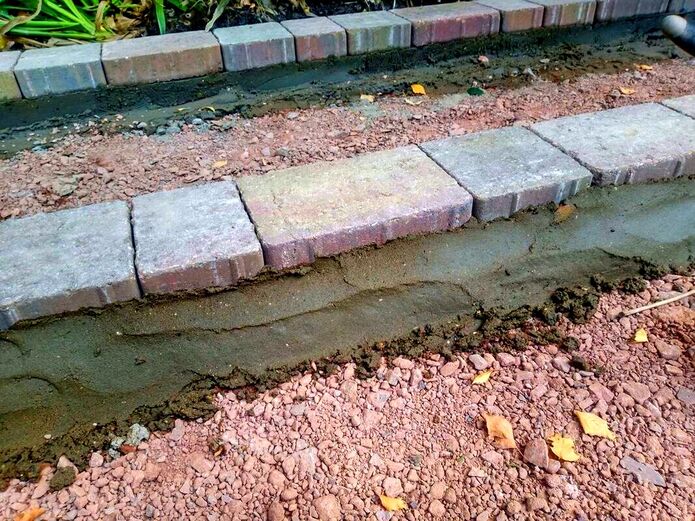
One at a time, tap your block paving edging onto the mortar. They should have a consistent mortar bed under each block for the length of the edgings. You can use a string line and spirit level to maintain a consistent level. Alternatively you can level long paths of mortar like you would do levelling concrete. After an hour, the mortar bed will become firm enough for you to gently place the edgings straight on. You want the mortar to be firm but still sticky and moist on the surface.

Make sure that your edgings are relatively level widthways as you work. If you lay them with too much of an angle the edgings will look odd from a distance.
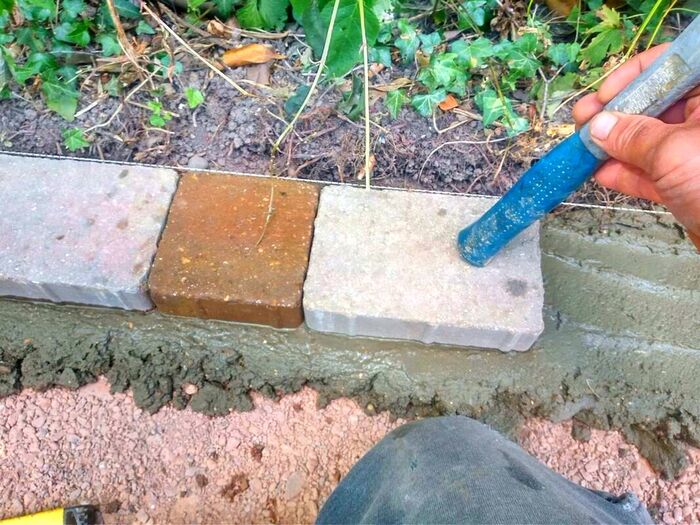
Step 10
Once you have your blocks bedded to the correct level and position you can haunch them in. This involves pointing a triangular mortar fillet around the edge of the blocks to hold them in place. Try to keep the haunch lower than the top of the blocks. This will help to conceal any unattractive mortar haunching.
You have now completed your block paving edging! Thank you for reading our article on how to create garden edging with block paving! Below I have linked to some other relevant articles you may find useful.
|
|
|
|
|
|
|
'As an amazon affiliate I earn from qualifying purchases'
This article contains affiliate links
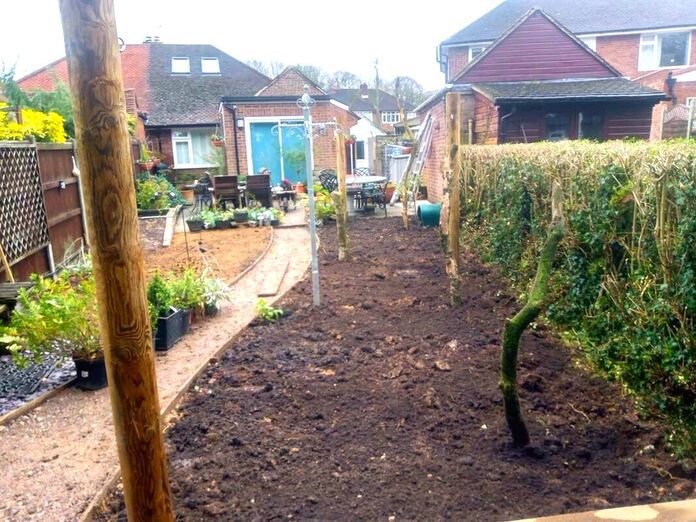
Well planted flower borders bring seasonal interest, elevation and colour to our gardens.
The most exciting back yards always have a diverse array of plant species displaying various visual textures and colours.
However, there is absolutely no escaping the fact that flower beds are hard work to keep under control. This is especially so when borders are initially planted as plants take time to become established.
During establishment flower borders can become gradually invaded by encroaching weeds and tree saplings.
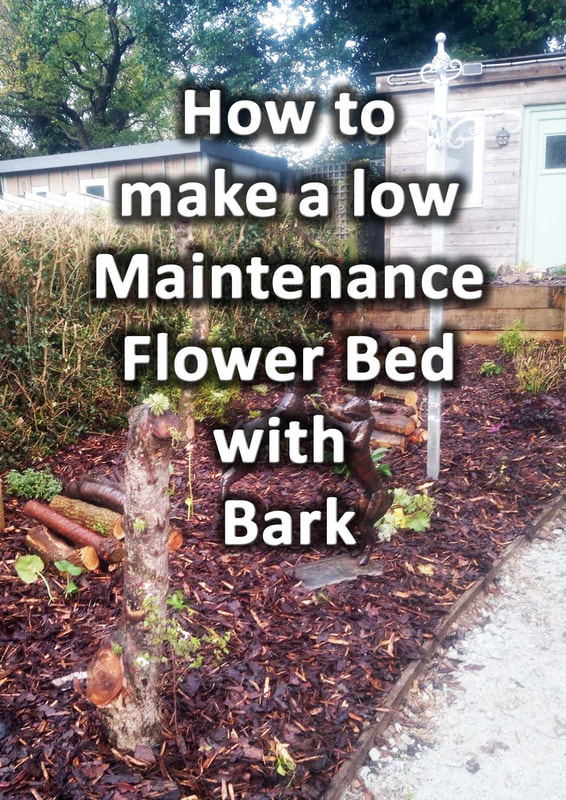
Therefore the best strategy is to create a low maintenance flower bed with membrane and bark. Once planted, the combination of a robust weed barrier and bark mulch will prevent weed encroachment.
This means your plants can establish with ease and reach their maximum potential with little input.
In this article I will show you how to create a low maintenance flower bed with bark, step by step.
Should you put bark on flower beds?
Bark mulch and wood chips help to retain moisture, prevent weeds, protect roots from frost and feed the soil. Therefore it is a good idea to put bark on flower beds if you can.
Bark mulch and wood chips help to retain moisture, prevent weeds, protect roots from frost and feed the soil. Therefore it is a good idea to put bark on flower beds if you can.
What are the benefits of bark mulch?
Bark mulch adds a protective layer to the soil which holds in moisture and protects the soil from the sun.
As bark organically breaks down it helps to feed soil ecosystems which keep the soil naturally healthy. These microorganisms help to oxygenate the soil as well as distribute nutrients evenly.
Bark also feeds the soil as it breaks down and improves the soils structure. This helps to alleviate and prevent the threat of compaction so plant roots can spread easily.
How do I add bark to my soil?
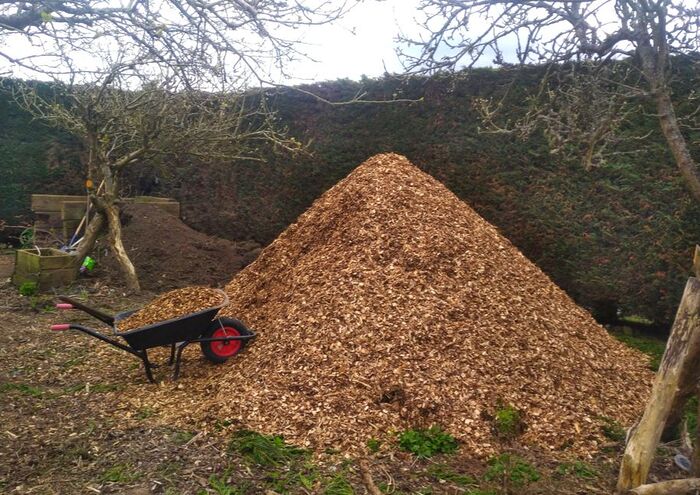
The best way to add bark to your soil is with a wheelbarrow and a rake. If you want to get the very best out of your bark, spread it generously.
The thicker the mulch the longer it will take to break down. Try to aim for a minimum of 40mm depth. It is much cheaper to buy bark chippings in bulk either in jumbo bags of tipped loose.
I have found one of the best ways to shift bark mulch is with a pitch fork and long handled shovel.
Which is better bark or mulch?
Mulch in many ways is a blanket term for various, organic mulching materials. For example organic bark chippings are a form of mulching the soil.
However, on the whole, mulches are materials which may break down faster and provide food for the plants below. Bark is thicker and woodier meaning it breaks down much slower.
This makes it popular for surfacing play areas and even pathways as well as utilised for mulch.
If you want to cover your flower beds in a consistent looking material that lasts, bark is a better choice.
What should I lay down before bark?
You do not necessarily have to lay down anything underneath landscaping bark. Allowing bark to make direct contact with the soil will enable the soil to breathe and invigorate soil life.
However, bark in contact with the soil will degrade much faster than on a membrane. Therefore, it is advised to add a generous thickness of bark when applying straight to soil.
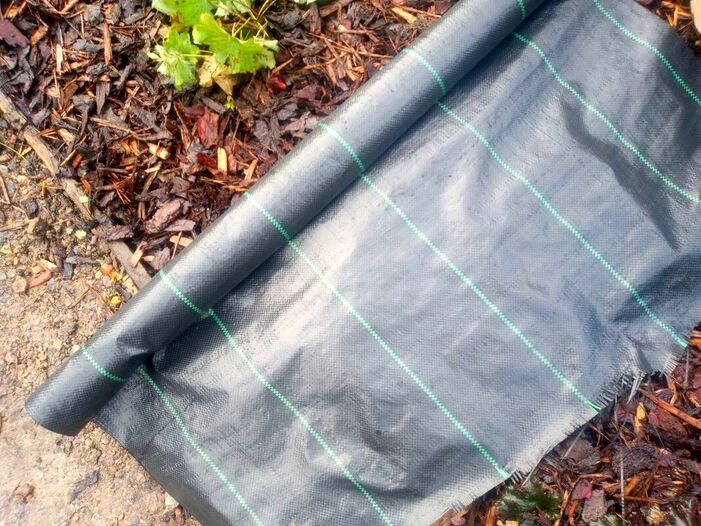
To provide extra protection from weeds it is advised to lay a weed suppressant membrane underneath bark. The barrier between bark and topsoil will make the bark degrade much more slowly and look better for longer.
For even more protection you can spread a 10mm layer of sharp sand under the membrane. This will allow surface water to drain away faster reducing the chance of bark decomposing prematurely.
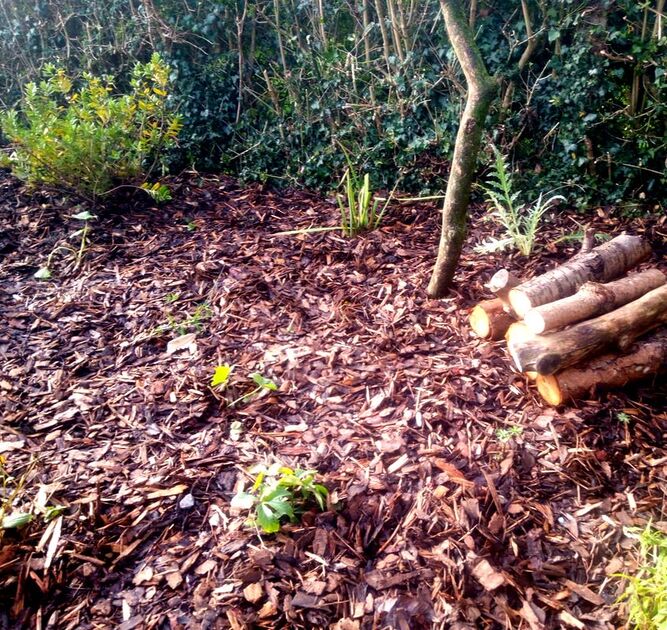
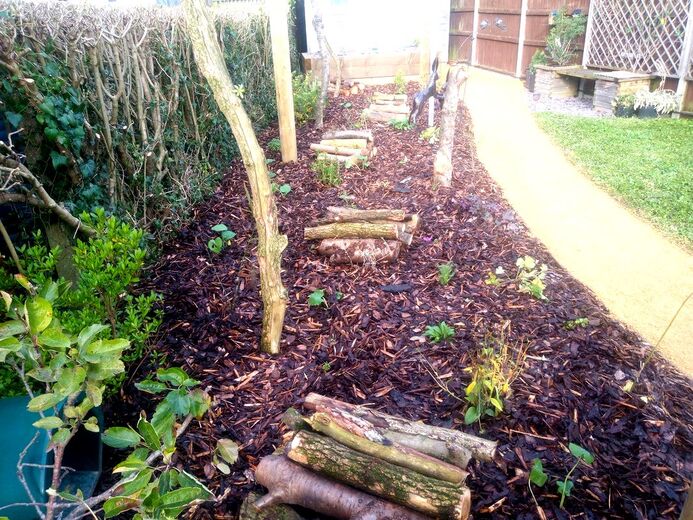
How to create a low maintenance flower bed with bark step by step?
Step 1: Dig over the ground deeply and remove any perennial weeds or roots from the soil.
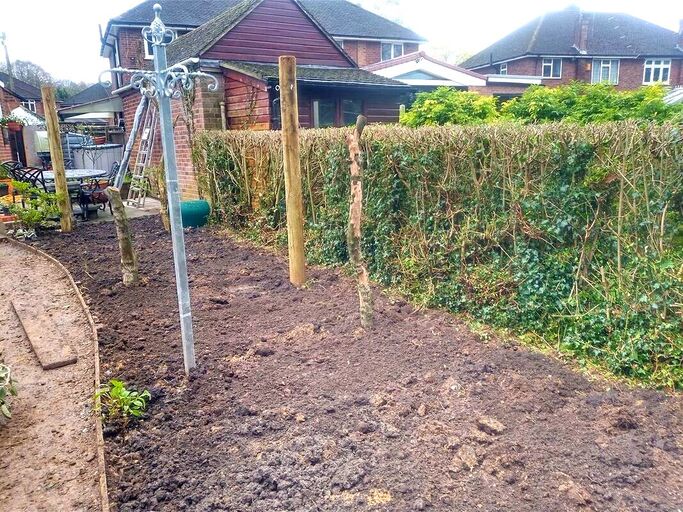
Step 2: Work the soil to an open and crumbly texture relieving any compaction and clods. If you have particularly heavy soil such as clay, work in plenty of sharp sand and organic matter. For more information on how to improve your garden soil read our guide here.
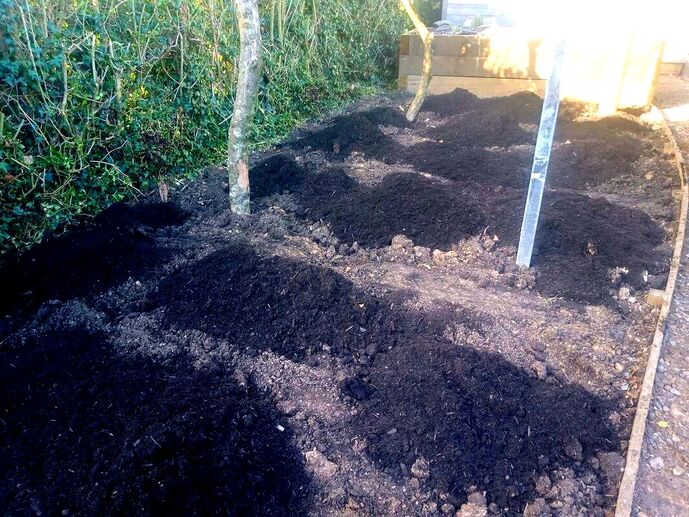
Step 3: Supply and spread a 50mm layer of tree and shrub compost evenly to the surface of the soil. This element is not essential but will reap the best results for newly planted plants.
Step 4: Supply and lay a robust, weed, suppressant, membrane to the surface of the flower border. Make sure the membrane overlaps by at least 100mm near joins. Peg down the membrane where necessary with membrane pegs.
Step 5: Supply and spread a 40-50mm layer of bark mulch or wood chippings to your flower border. It is more economical to buy bark in bulk such as jumbo bags or loose loads. Work out how large your bed is in square metres and then times it by the depth. For example, if your border is 30 square meters and you want 50mm of bark the calculation would be.
30 x 0.050 = 1.5
Therefore you would need 1.5 cubic metres of bark. Typical jumbo or bulk bags hold about 0.6 cubic metres of volume. Therefore, for this example, you would need about 6 jumbo bags of bark.
30 x 0.050 = 1.5
Therefore you would need 1.5 cubic metres of bark. Typical jumbo or bulk bags hold about 0.6 cubic metres of volume. Therefore, for this example, you would need about 6 jumbo bags of bark.
Step 6: Supply the shrubs, plants and bulbs you want and set them out upon the bark surface. Make sure you have allowed suitable space between the plants for them to establish.
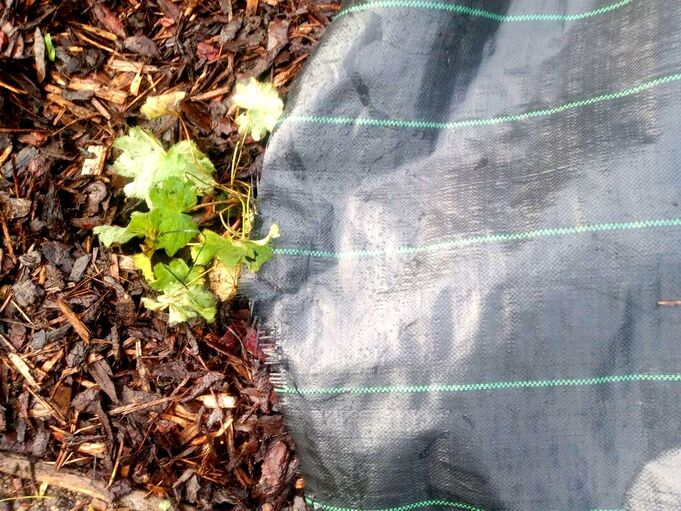
Step 7: To individually plant your plants, pull back your bark to uncover the membrane. Using a sharp knife, cut an ‘X’, planting, pocket inside the membrane. Excavate a planting pit and plant your plants individually into the flower border. Try to plant your plants so they sit slightly proud of the soil line. This will stop the bark from swamping the young plants when you re-spread the bark.
Step 8. When you have completed the whole bed give all the plants good water in. The best time to plant a low maintenance flower bed with bark is autumn. This gives the plants plenty of time to establish before the next growing season.
Thank you for reading our article on how to make a low maintenance flower bed with bark. Below we have linked to more relevant articles you may find useful.
|
|

|
|
|
|
|
'As an Amazon associate I earn from qualifying purchases'
This article contains affiliate links
Pathways are a great way to create an outdoor journey or link up functional parts of the garden.
However, pathways like all surfacing can be expensive! Paving requires expensive materials and skilled labour while traditional gravels can become displaced and infiltrated by weeds.
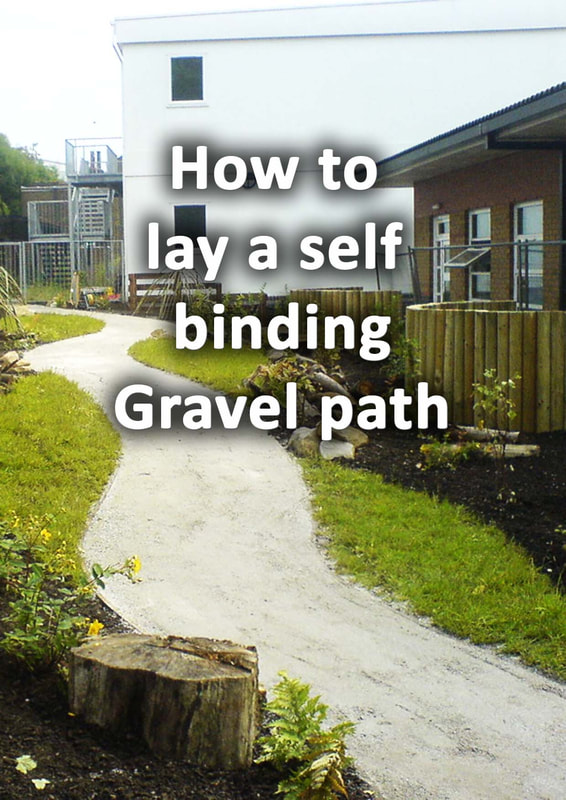
This is probably why free binding gravel is becoming an ever popular surfacing solution for garden pathways. Not only is it fast to lay it comes in a decorative array of colours and textures.
Here I will discuss the advantages of binding gravel and how to lay a self binding, gravel, path, step by step.
However, pathways like all surfacing can be expensive! Paving requires expensive materials and skilled labour while traditional gravels can become displaced and infiltrated by weeds.
This is probably why free binding gravel is becoming an ever popular surfacing solution for garden pathways. Not only is it fast to lay it comes in a decorative array of colours and textures.
Here I will discuss the advantages of binding gravel and how to lay a self binding, gravel, path, step by step.

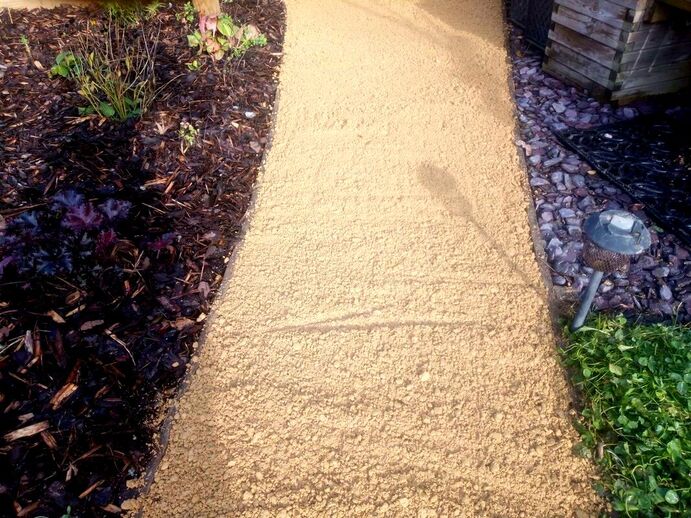
One of our self binding gravel pathways built using timber boards and Cedec silver, self binding gravel
What is self binding gravel?
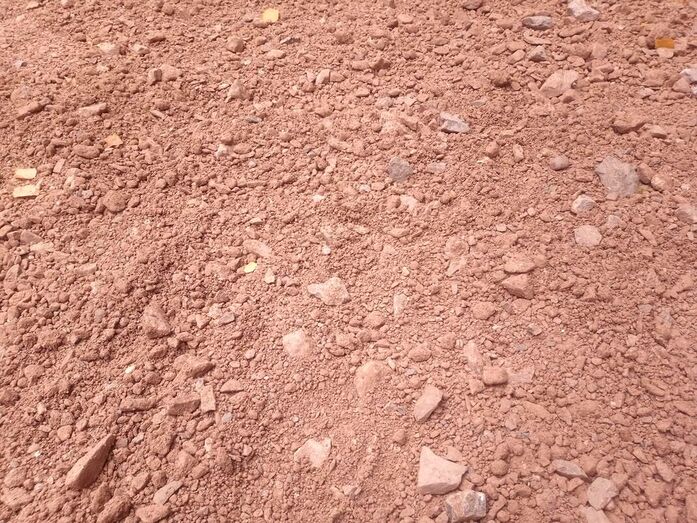
Self binding gravel is a finely graded surfacing gravel which, when laid, forms a smooth and attractive surface.
It contains a combination of sand, rock particles and clay which when moist and compacted creates a bound surface. Self binding gravels take on the qualities of the rock dust particles which make them up.
This means they come in a variety of natural colours which will not fade over time. Such qualities make self binding gravel effective for modern gardens seeking contextual materials.
Self binding gravel can also replicate the habitat value of exposed gravels and rock.
This combined with minimal processing and potential for recycling makes it a much more sustainable choice. Not only can self binding gravel be used for paths it can also be used for other surfaces.
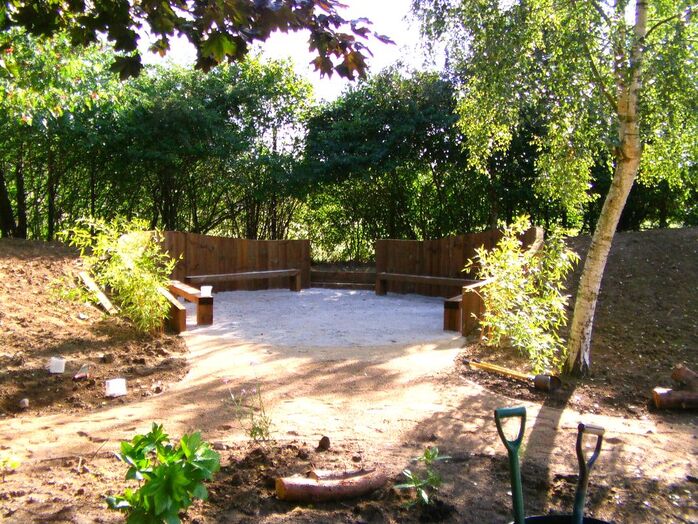
Bound gravel can be used for seating areas, rockeries and even as compacted mulch for arid and Mediterranean planting schemes.
The gravels evenly graded particles range from 10mm down to dust giving it a smooth but finely textured surface.
This combined with minimal processing and potential for recycling makes it a much more sustainable choice. Not only can self binding gravel be used for paths it can also be used for other surfaces.
Bound gravel can be used for seating areas, rockeries and even as compacted mulch for arid and Mediterranean planting schemes.
The gravels evenly graded particles range from 10mm down to dust giving it a smooth but finely textured surface.
Is self binding gravel any good?
Self binding gravel is an extremely effective landscaping surface and can be used for many different themes and styles. It is fast to lay and comes in a wide variety of colours and materials. However like most materials it has some advantages and limitations.
Below I have listed the pros and cons for landscaping with self binding gravel.
Pros and cons of self binding gravel
Pros
- A sustainable choice with no chemical processing or cement base.
- Relatively easy to lay with little need for skilled labour.
- Looks attractive with a smooth but lightly textured surface.
- Comes in a wide range of warm and natural colours which do not fade.
- Can surface Mediterranean planting schemes and enhance microclimates.
- Fast to lay making it much less labour intensive and a more affordable surface.
Cons
- Expensive compared to traditional loose gravels.
- Susceptible to surface weed encroachment.
- Can erode in times of heavy rain or moving surface runoff.
- Challenging to lay to consistent falls to prevent puddling.
- Wildlife and pets can disturb and scratch up the surface.
- During wet weather residues can be walked across adjoining surfaces.
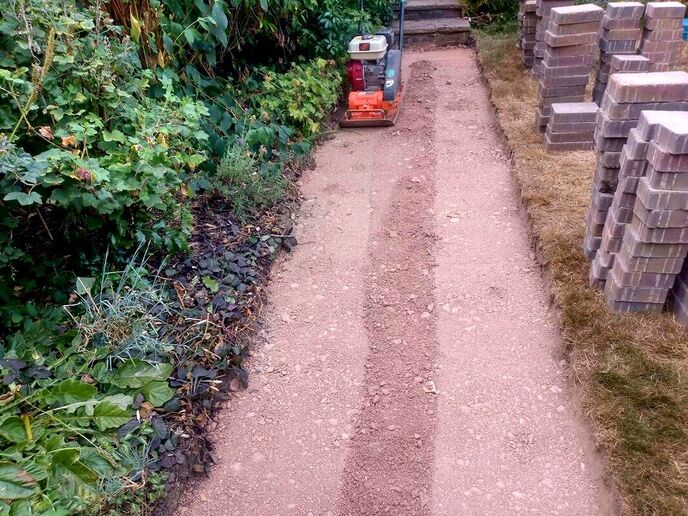
How to lay a self binding gravel path step by step
Step1.
Mark out for preferred route, design and shape of your new path. This can be designed on a plan of your garden or by sketching over site photos.

Step 2.
When you have decided on a shape and route mark out your pathway on site. This can be done with spray paint or pegs.
Step 3.
Dig out your path to a depth of 130mm deep removing any soft dirt or loose soil. You can either use your soil elsewhere or dispose of it within a skip. Always dig out your path a little wider than what you need to make room for edgings. Also retain a little good soil to grade around your path when its complete.

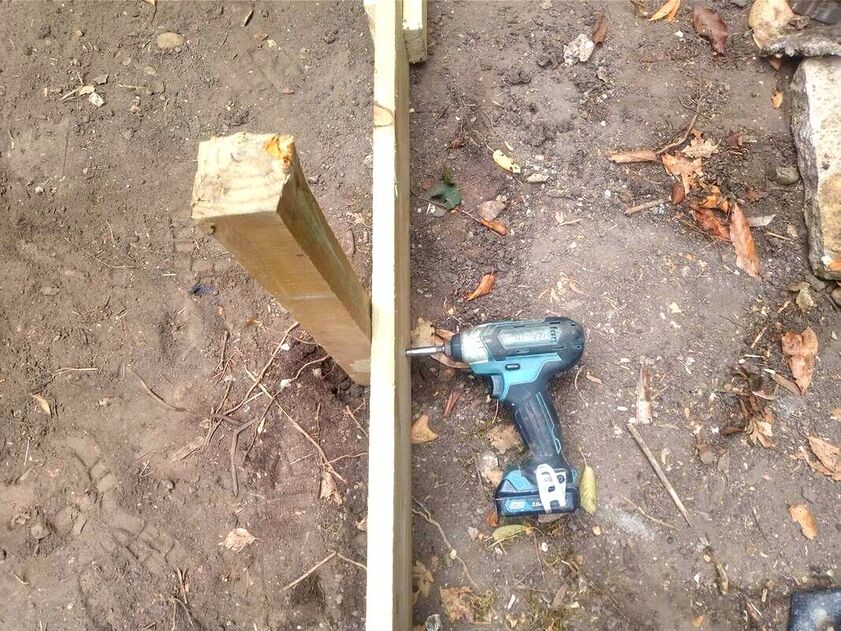
Step 4.
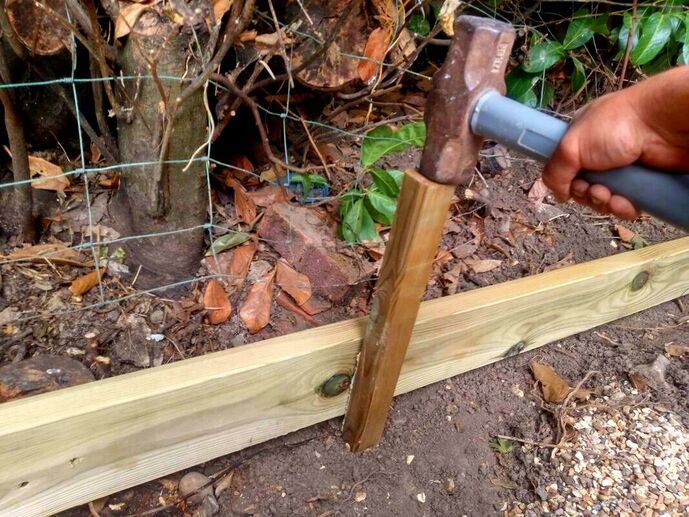
Install your edgings these could be brick, blocks, setts, steel edging or timber gravel boards. In this example we are using 100mm timber gravel boards fixed to pegs.
Step 5.
Connect your timber edging boards together with small sections of board used as connectors.
Step 6.
Place you’re edging boards into position and fix them to 50mm pegs hammered into the ground. Before fixing edgings with screws make sure your boards are at your preferred height. Consistent heights over distance can be achieved by working to a string line.
Step 7.
When your edgings are fixed solid, supply and spread a 90mm layer of mot type 1 compactable hardcore. This is available at all builders’ merchants and available in jumbo 850kg bags.
Step 8.
Using a compactor plate whack the type 1 until it is well compact. Remember this material will compact down at this depth about 15mm so factor this into your calculations. You should now have about 30 – 40mm distance from the hardcore to the top of the edgings.

Step 9.
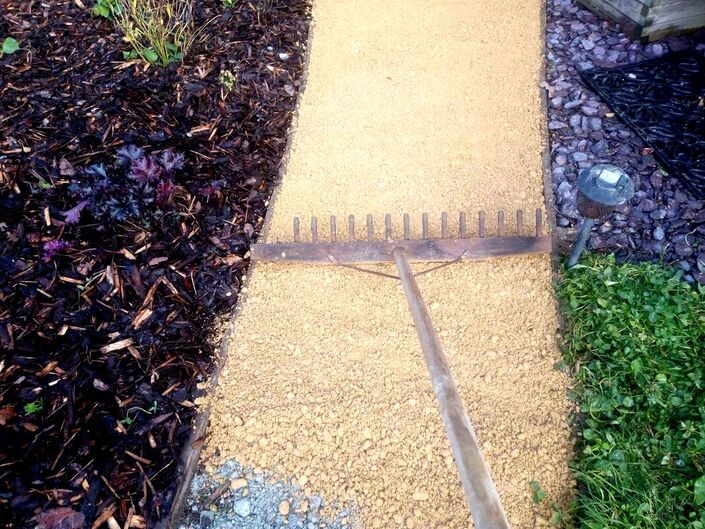
Load your self binding gravel into a wheelbarrow and start spreading it along your path. Remember, this will also compact down so try to spread it slightly proud of the edging boards. You will want surface water to run off the path and into surrounding areas to prevent puddles. Therefore you will have to create a gentle camber or arch to your gravel.
Step 10.
When you have spread your gravel, doing pigeon steps, consolidate the gravel underfoot. This will enable you to re-grade any areas which have sunk too much with the back of your rake.

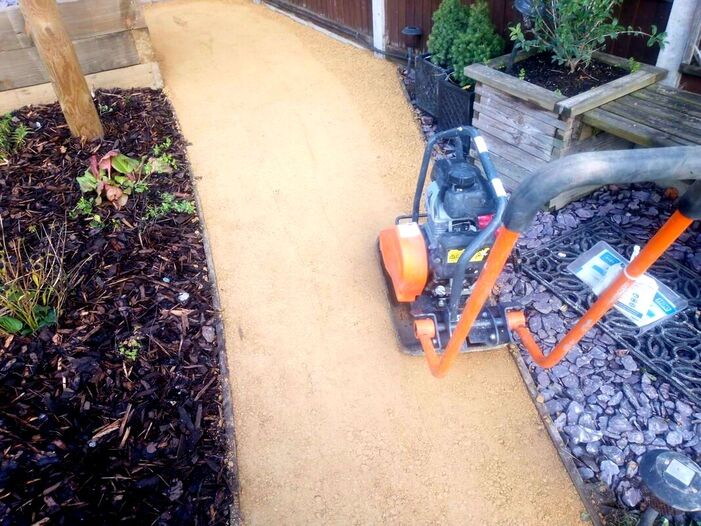
Step 11.
Using a vibro-compaction plate, whack the gravel to a firm and consistent surface. It helps if the gravel is slightly damp before you start. This will lubricate the gravel particles and make them bond consistently. When making sharp turns with the whacker, go slowly so you do not create ruts within the surface.

Step 12.
Your self binding gravel path is now complete! If your whacker plate has left line imprints in the surface these will usually erode away after a rain shower. However, you can always give the gravel a light sprinkling with a hose, spray, attachment.
Is self binding gravel good for patios?
Self binding gravel can be used for patios however there are some elements you must consider first.
Firstly, gravel is much more challenging to spread and compact to consistent falls and gradients. This means you may find it challenging to implement a surface water drainage strategy.
Furthermore, during times of heavy rain gravel particles can be washed into drains and gulley’s potentially causing blockages. As self binding gravel drains slowly you may end up with puddles across your patios surface.
Binding gravel is a firm surface but can potentially be disturbed and displaced. This is especially so with movable furniture such as tables and chairs.
Consequently, for a primary patio with seating, self binding gravel may not be the best choice. However, patio areas with less intensive foot fall and a more rustic aesthetic, are more suited.
This makes self binding gravel effective for naturalistic seating areas and transitional zones to conventional hard surfacing.
Do weeds grow through self binding gravel?
As long as a self binding gravel surface is laid correctly no weeds should grow in or through it.
Firstly when you excavate for your gravel surface make sure you remove any visible roots. This will ensure there are no perennial weeds rhizomes left within the sub-soil.
Make sure you build up the correct hardcore depth with compactable mot type 1. This will form a dense and formidable boundary for any weed roots.
Also make sure you are generous with the thickness of your gravel, It is tempting to spread it too thin to save money.

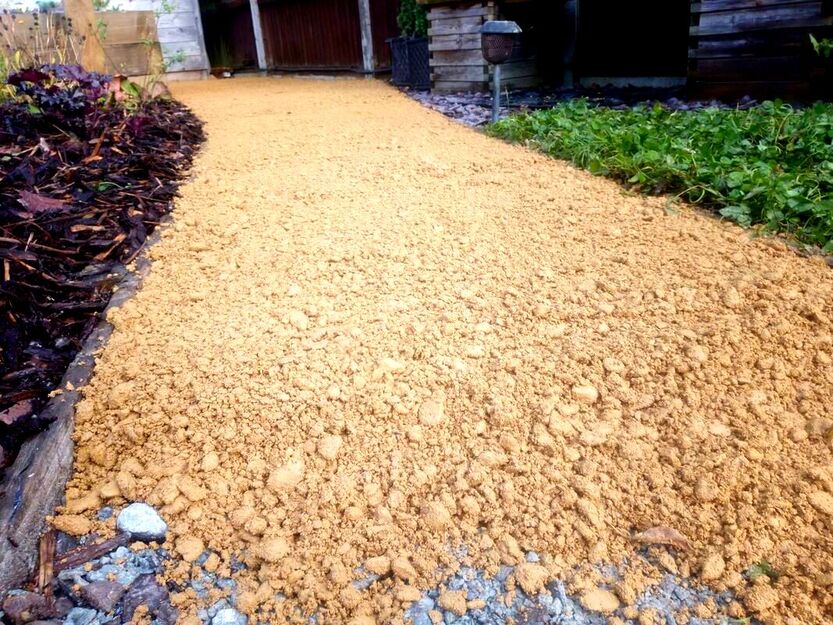
One of our self binding gravel paths built using Breedon Golden Amber self binding gravel
However, the thinner your gravel the more chance the surface could become infiltrated by small weeds.
From experience I have found that weeds are more likely to encroach onto and over your gravel from surrounding beds. This is particularly so with wild, and spreading, grasses.
The best way to mitigate this is to lay your gravel areas slightly higher than surrounding beds.
This can be achieved by installing your retaining edgings higher and prouder of any surrounding ground.
Does free binding gravel need a sub base?
Free binding gravel which is laid to take the weight of pedestrian traffic must have a sub base. This will provide a robust base so the gravel above does not become displaced under pressure.
The most effective sub base for free binding gravel is mot type 1. Its angular particles lock tightly and when compacted provide a continuous and solid base.
However, self binding gravel, like other gravels can be utilised as mulch around flower borders. It can be extremely effective for Mediterranean gardens and arid, desert, planting schemes.
In such scenarios self binding gravel does not require a sub-base. However, it should be laid on a weed proof membrane as not to mix with the soil below.
In such scenarios self binding gravel does not require a sub-base. However, it should be laid on a weed proof membrane as not to mix with the soil below.
Is self binding gravel permeable and does it drain?
Self binding gravel does have some permeability but it is considerably more impervious to water. This means water will puddle and run off rapidly in times of heavy rain.
It is also important to note that self binding gravel can be eroded from surface water flows. Therefore, make sure your gravel is not laid in the path of a surface, water, funnel, point. Or the low point or valley within the surrounding land form.
Although self binding gravel will eventually drain puddles can persist in times of heavy rain.
Consequently it is best to lay with a slight gradient or camber to flower borders and lawns.
Thank you for reading our article on how to lay a path with self binding gravel. If you would like us to provide you with a quotation for laying a self binding gravel surface contact us!
We are experienced contractors in laying self binding gravel surfaces and installing any gravel, edging, specification.
We are experienced contractors in laying self binding gravel surfaces and installing any gravel, edging, specification.
|
|
|
|
'As an Amazon associate I earn from qualifying purchases'
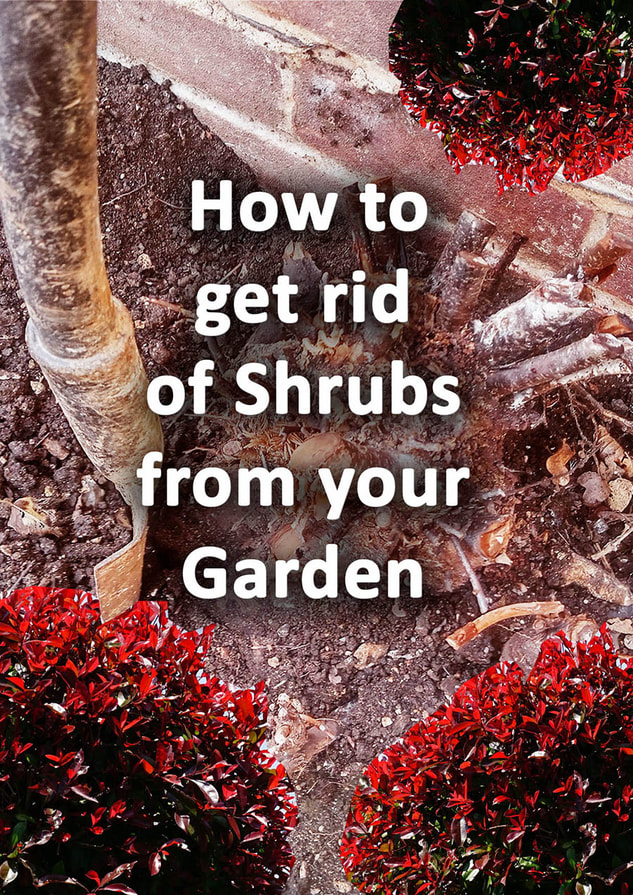
This article contains affiliate links
Shrubs are an essential addition to any garden planting scheme. Not only do they provide a backdrop to shorter plants they also help to soften fences and screen bad views.
Shrubs have a variety of other visual attributes such as decorative flowers and foliage.
However many shrubs, once established can become very large and difficult to maintain.
When shrubs get very large, they lose their natural form and have to be cut into geometric shapes. Many times, we choose to simply get rid of shrubs which have become too cumbersome.
The only problem is many shrubs have the vigour of small trees with robust roots and tough bases. This can make them very challenging to get rid of without adopting some heavy-duty digging and chopping.
It is reassuring to know that it is very possible to get rid of shrubs from your garden if you follow a process.
In this article I will explain how to get rid of shrubs by the roots with some other shrub removal tips and hacks.
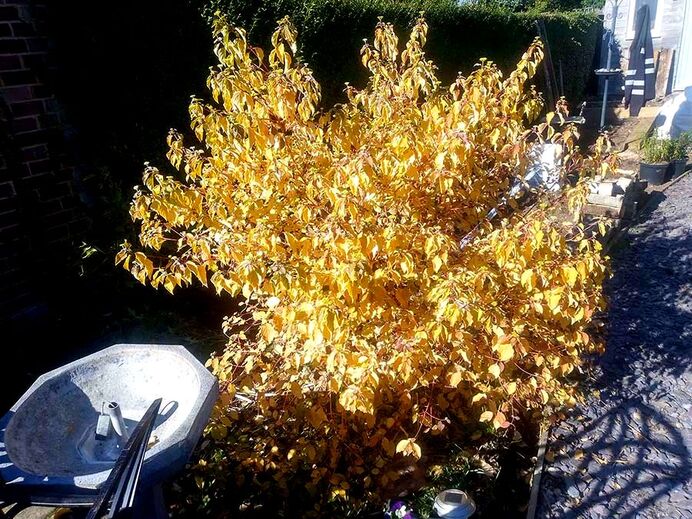
How to get rid of shrubs by hand
The uncomfortable truth is the most practical way to remove shrubs is by hand.
Ideally the best time of year to dig out a shrub or stump is during the spring. At this time of year the ground has higher moisture content from the previous winter months.
This makes it easier to dislodge stubborn roots and start to work the stump loose. The most important aspect of digging shrubs out by hand is using the correct tools and methodology.
We will describe all of these below.
Best tools for removing shrubs
- Spade
- Digging bar
- Grafting spade
- Mattock
- Hand saw
- Loppers
- Sledge hammer
- Buckets
- Power drill
Step 1:
Trim off most of the shrubs foliage and branches but keep as much of the central trunk as possible. This central trunk will allow you to pull at the stump and roots with mechanical leverage.
Step 2:
Excavate a trench all the way around the root mass of the shrub as close to the roots as possible. You should try to dig at least 300mm deep and scoop the loose soil out of the excavation. Try to dig under the root mass as much as possible and clear compacted soil around from the anchor roots.
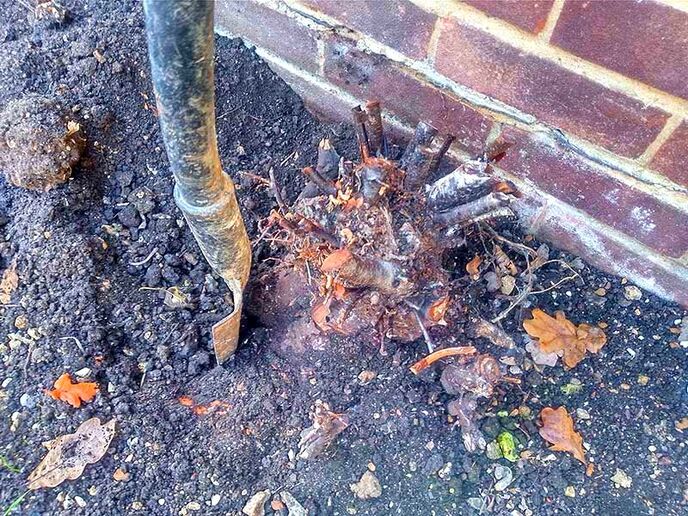
Step 3:
Using a digging bar, grafting spade or mattock, chop through any anchor roots you come across. Most shrubs have lateral anchor roots all the way around the trunk with a central tap root. The central tap root is typically tough and penetrates the ground vertically providing stability. You need to chop out as many side anchors as possible to begin to rock the stump on the tap root.
Step 4:
Any large roots which are too thick to chop through must be cut with an old a saw. At this point you should be able to move the whole stump by pulling on the trunk. Thrust the trunk back and forth and from the movement work out where the roots are still attached.
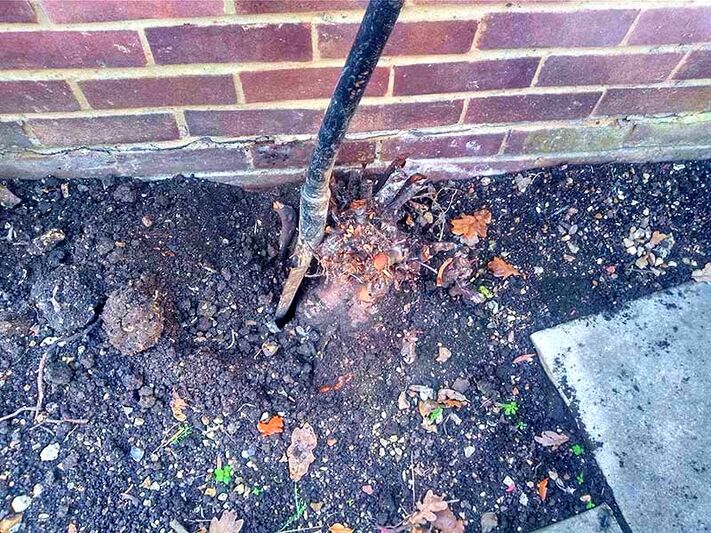
Step 5:
Excavate out soil and explore for further roots which are preventing you from pulling the stump over. When you discover extra hidden anchor roots dig around them to expose them and chop them out.
Step 6:
Eventually you will be able to rock the stump via the trunk easily and violently from side to side. At this point it is probable that only the central tap root now remains. Keep rocking the trunk robustly to dislodge compacted soil and to try to snap the tap root.
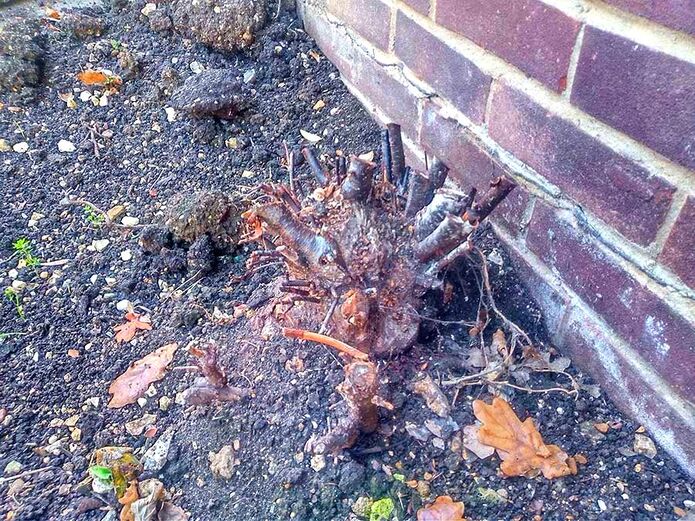
Step 7:
If the shrub has a very strong tap root you will find it is difficult to move the stump even a little. If so, try impacting the stump with a sledgehammer to try to loosen its grip on the ground. Go very easy at first and do not swing the hammer too far in case you miss.
Step 8:
If the shrub has thick roots you can use a power drill to weaken them. Using a power drill, core out holes from the centre of thick roots. This will weaken them significantly and make them easier to snap out of the ground.
Step 9:
If you are having trouble breaking the central tap root you can chop it horizontally with a grafting spade. Gradually chop at the root until it is severely weakened or snaps completely.
Step 10:
Once the stump is removed chop out any large surface roots with a mattock or spade. Turn over the ground and level it well for future cultivation.
Removing a shrub with a vehicle
If you are having particular difficulty removing a bush by hand you can wrench it out with a vehicle. However if you do this, I strongly recommend that you excavate around the bush first.
Some shrubs can even be too stubborn for some vehicles to pull out. Excavating first will ensure less chance of damage to the vehicle.
Make sure you use a strong rope and slowly increase tension with the accelerator. Never gain any speed and try to yank out a shrub by force.
Below we have embedded a video on how to remove a shrub with a vehicle correctly.
|
|
|
|
'As an Amazon associate, I earn from qualifying purchases'

This article contains affiliate links
There are many types of different garden drain and all of them have the potential to block.
Gardens and other outside spaces naturally accumulate organic debris, dust and dirt from the surrounding environment. These materials over time can build up in grates and pipes leading to standing water blockages.
Roof gutters and grated channel drains can easily become clogged with leaves and moss. These can discharge into drainage pipes and soakaways, however, the most common scenario is a pea trap or surface, sump, drain becomes clogged.
These small and normally square, grated, drains are easily prone to silting and blockages. In this article we will show you how to unblock a garden drain with standing water step by step.
Why is my garden drain blocked?
Many typical garden drains have a U-bend built in. This allows for a continuous water seal between the pipework and the outside.
This prevents odour from escaping from the drain and allows wastewater to pass through easily. The problem is, over time, these U-bends can become filled with silt and debris.
This can lead to a complete blockage and continuous standing water.
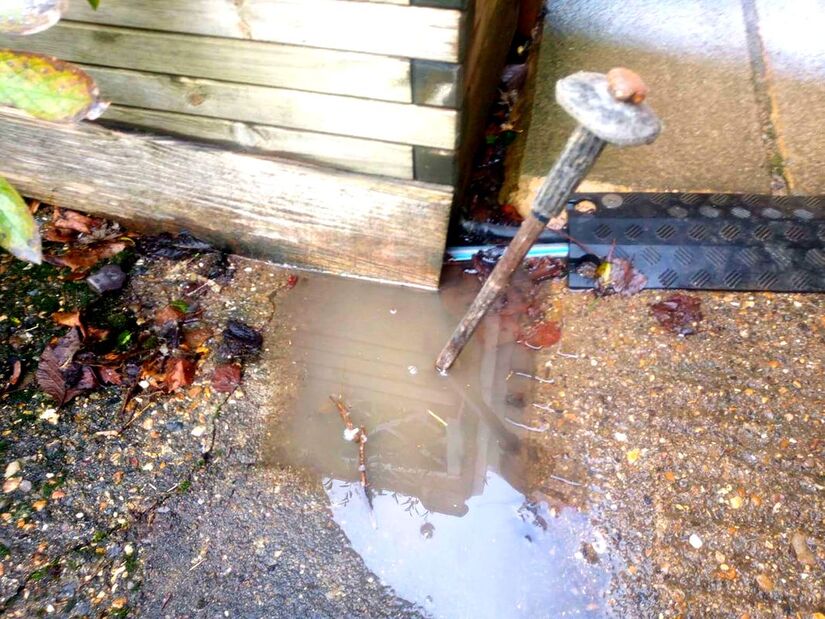
Particularly in much older homes it is common to find square grated sump drains installed to low points within surfaces.
Many of these have no U-bend and simply have a vertical pipe which feeds into the ground below.
These are these easiest drains to block as they rely on the natural permeability of the ground to drain. In both cases you will need to unblock your drain for them to continue to draining water away.
Many of these have no U-bend and simply have a vertical pipe which feeds into the ground below.
These are these easiest drains to block as they rely on the natural permeability of the ground to drain. In both cases you will need to unblock your drain for them to continue to draining water away.
How to unblock a garden drain step by step
Regardless of if you have a sump drain, U-bend or pea trap you will need to investigate by hand. Put on an elbow length rubber glove before you begin:
Step 1:
Remove the grate which is installed over the garden drain. This can normally be achieved using a screwdriver or long chisel.
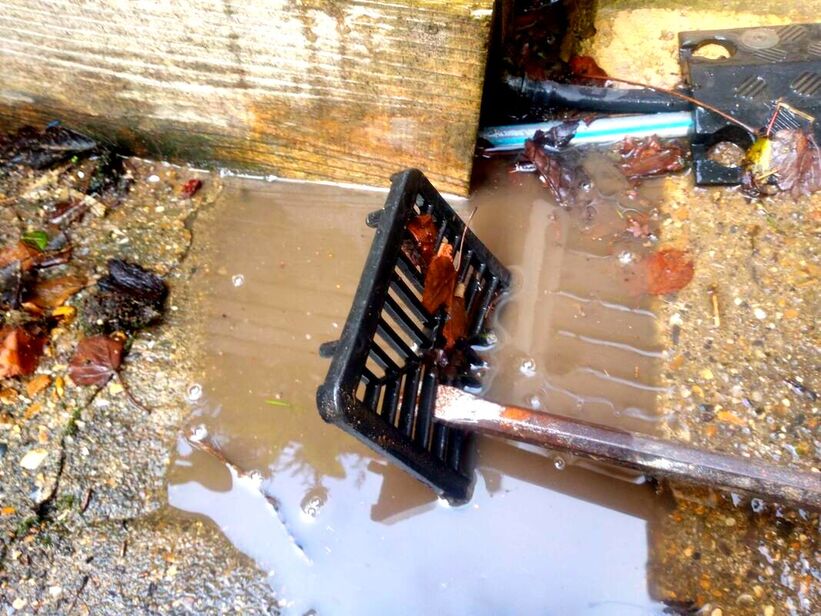
Step 2:
Slowly lower your hand down into the drain feeling for obstructions. Be careful, there may be sharp material fragments which have fallen into the drain!
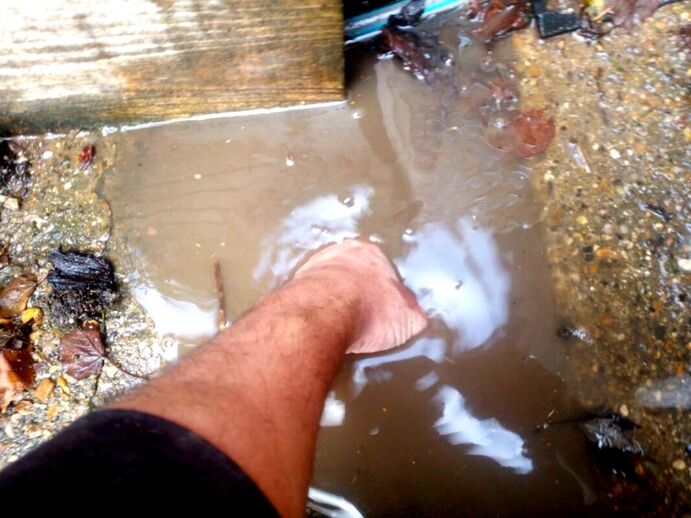
Step 3:
Feel around gently to discover where the pipe leads and what the blockage is. Usually you will find many years worth of fine silt and muck. You may also find a large obstruction like piece of wire or wood.
Step 4:
Remove any obstructions you find and scoop out any silt or muck you find and dispose of it.
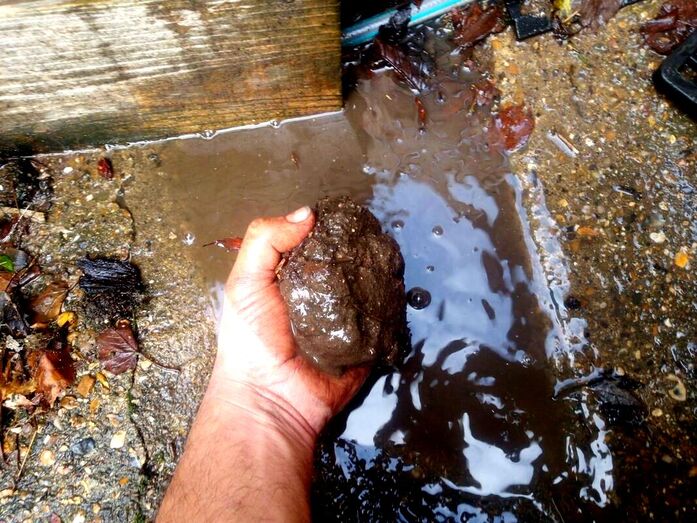
Step 5:
Take care not to force your hand too far down the pipe and risk getting stuck! Make sure you can manoeuvre your hand around well as you work.
Step 6:
When the drain is clear of obstructions water will drain away easily. You then need to flush out the drain with a hosepipe. When the water backwash is clean and draining freely you have successfully unblocked the drain.
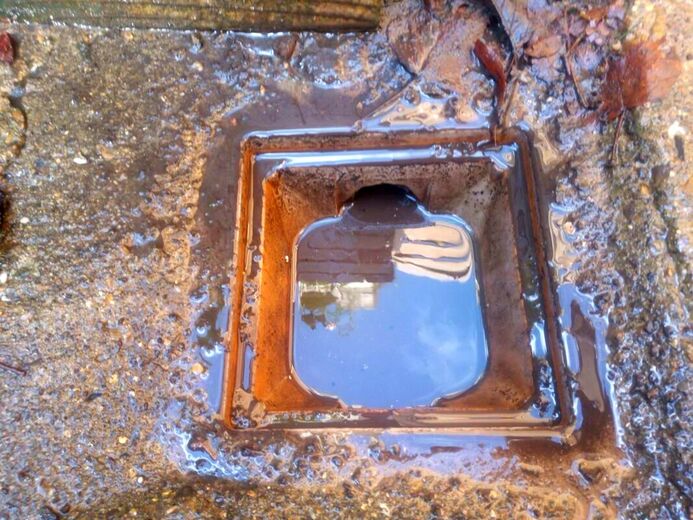
Step 7:
It is a good idea treat your drain with some disinfectant, this will stop germs from breeding and relieve any odours.
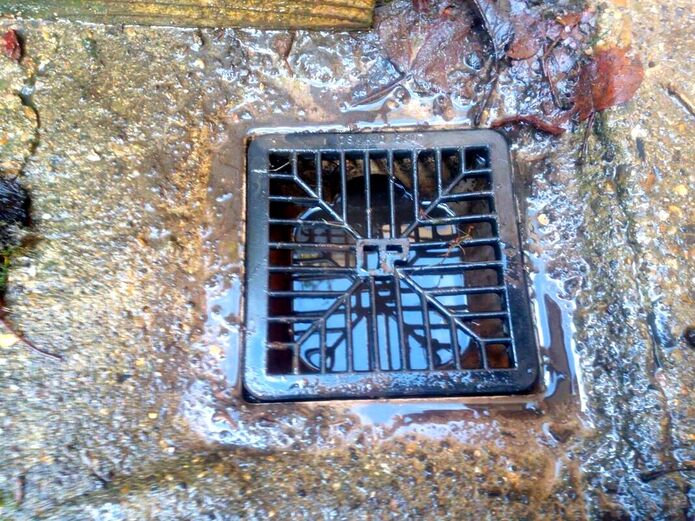
What can I buy to unblock a garden drain?
Sink plungers
Sink plungers are traditionally used to unblock sinks. However large plungers can be used to unblock small garden drains. The large, rubber sucker creates suction within the drain which can dislodge blockages.

Plumbing snakes
Plumbing snakes are ridged but flexible wire rods with a spiked or hooked end. These can be fed, down, along pipes and used to break through and disperse blockages.

Drain rod sets
Drain rods are generally for much larger drains and sewage pipes. These interconnected, flexible pipes have a ridged but flexible circular disc at the end. This can be fed far down a blocked pipe and smash through backed up blockages.

Drain unblocking solutions
There are many drain unblocking fluids and gels on the market today. Most of these contain strong acids which slowly break down blockage material such as hair and other materials.

'Thank you for reading our article on how to unblock a garden drain. Below we have included some other garden drainage articles you may find useful.

|
|
|
|
|
|
|
'As an Amazon Associate, I earn from qualifying purchases'

|
The Author
Paul Nicolaides
BA (Hons) Dip
Paul Nicolaides has over 30 years of recreational gardening and 20 years of professional landscaping experience. He has worked for landscape contractors including design and build practices across London and the South East. In 2006 he qualified with a BA Hons degree and post graduate diploma in Landscape Architecture. In 2009 he founded Ecospaces an ecological landscaping practice which aims to improve social cohesion and reduce climate change through landscaping. In 2016 he founded Buckinghamshire Landscape Gardeners which designs and builds gardens across Buckinghamshire and the South East. This blog aims to provide easy problem solving information to its audience and encourage others to take up the joy of landscaping and gardening.