|
This article contains affiliate links
There is no better way to create an outside space for seating and entertaining than a new patio.
Patios provide a level and robust surface perfect for bringing the inside, outside. Laying your own patio can also dramatically enhance the spatial transition between home and garden. If you want to know how to lay a patio as a beginner you have come to the right place! In this article I have broken down all of the steps and considerations you will need to lay a patio yourself successfully.
In principle laying a patio correctly is not difficult, however it is easy to get it wrong if you have little experience. The most important part of laying a patio well is good preparation.
If your levels have been meticulously planned and your sub-base installed correctly it will be much easier. In this article I will explain how to lay a patio correctly on a solid mortar bed step by step. I will include step by step images taken from personal patio projects I have laid over the past 20 years. Feel free to email me any specific questions you have after reading this patio laying guide. Tools for laying a patio
Materials list
Paving selection
The type of patio paving you choose does ultimately come down to your personal choice. However, from experience there are some things you should consider. What style are you trying to achieve? Is your garden style modern, traditional or does it have a particular theme? It is often wise to choose materials which are in keeping with your surrounding home or garden theme. For example if you live in a rural cottage you may wish to use sandstone slabs.
If you have a very modern taste then perhaps porcelain or a tile like slate paver may be more suitable.
Remember that outdoor patios are exposed to many more staining threats than indoors. Bright white or cream paving ay look great in magazines but may not be practical for your patio. Bird poop, leaf tannins, mud and spillages can stain very light coloured white and cream paving. Marking out
A very important part of planning your new patio is marking out. Deciding what shape and size patio can become a tricky endeavour. Sometimes it is a good idea to create a scaled drawing of your patio area to resolve a design proposal. If you are not a natural designer mark out various shapes and outlines until you are happy with the layout. Once you have decided on a scheme this can be marked out with spray paint or pegs. Working out levels
Working out your patios levels is one of the most important parts of patio installation. You will need to mark out your finished level across your patios surface area. This can normally be achieved using a long spirit level and tapping in timber pegs. Identifying the completed level will enable you to locate any necessary retaining features to the paving. This is often necessary if you are building a patio upon sloping ground.
When working out your levels ask yourself; where does surface water runoff need to be directed to? You will subsequently then need to level your paving with a ‘very slight’ fall or slope in that direction.
This will also help you to identify the necessary height of any surrounding steps or retaining features. Retaining walls and steps
If you require a retaining wall or step these are best installed before you lay the patio itself. This is so the structure can retain the sub-base for a suitable and thorough compaction. Retaining walls and steps are typically based upon a robust concrete foundation excavated into the ground. The size of the concrete foundation will depend upon the size of the retaining feature installed. Excavation
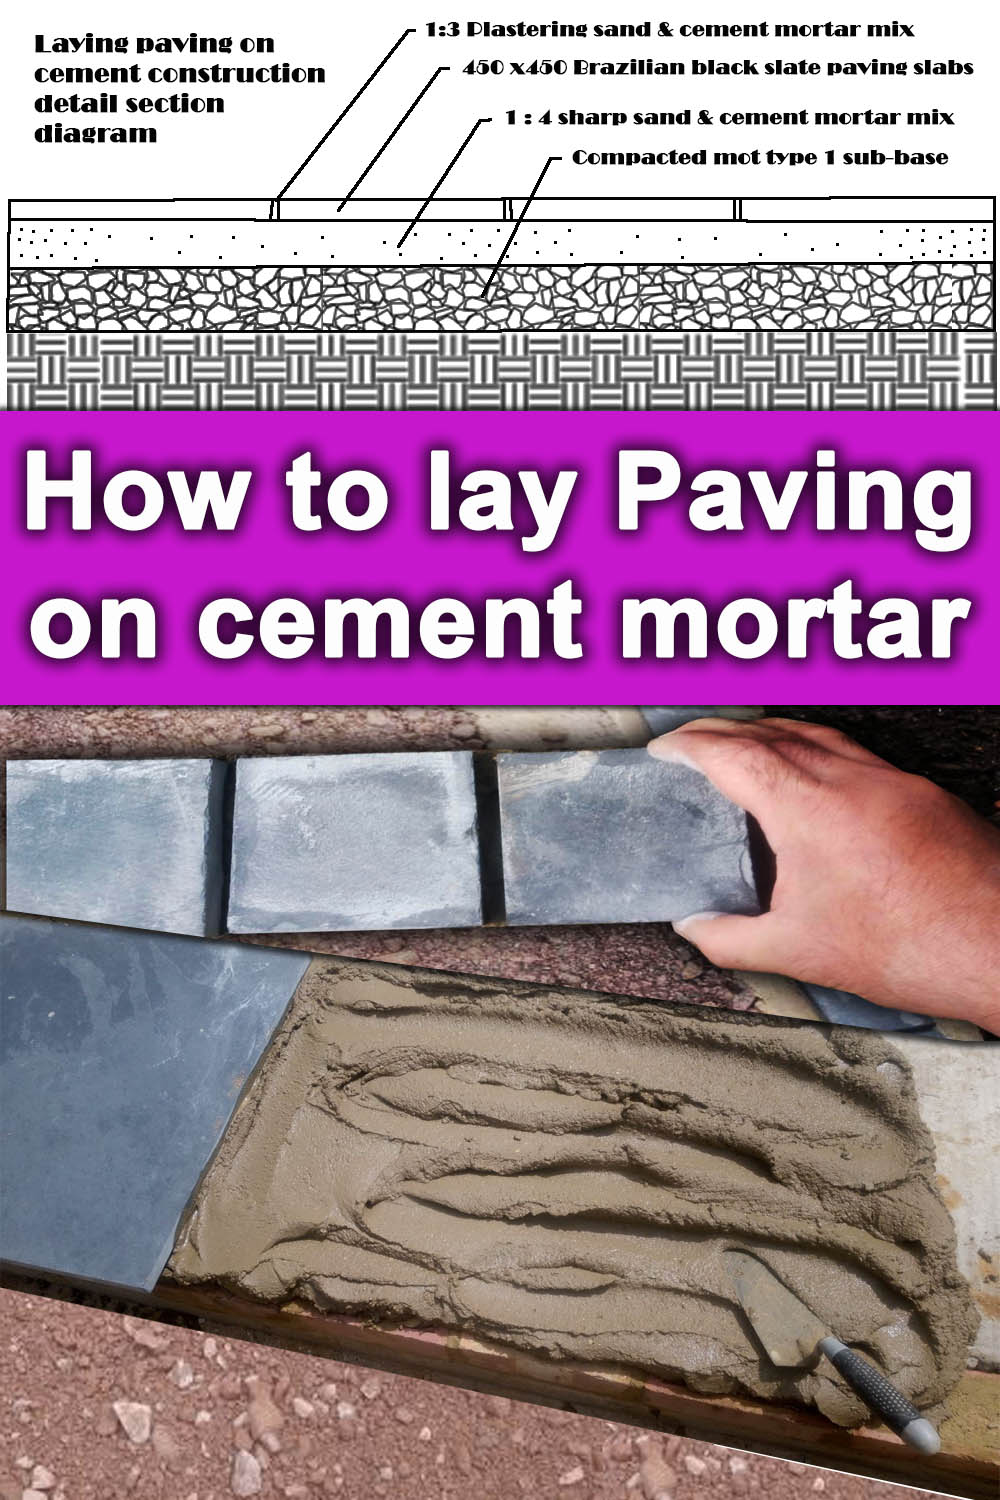
Once you have identified your completed level and installed any retaining features you can excavate your patio. Generally you will need to excavate to a depth of around 165mm. This will allow around 25mm for paving, 40mm for mortar and 100mm of compactable sub-base.
Excavate the patio area as neatly and squarely as possible with all loose soil removed from the base. The base of the excavation should be solid and firm with not soft ground or movement underfoot.
The best way to remove the soil from site is in a skip. Why not visit our article on how to fill a skip with soil here. Laying the sub-base
Once you have excavated your patio you must now spread your sub-base. The best material for this is compactable mot type 1. This dense stone aggregate has angular particles which lock tightly together when compacted. I find at this stage it effective to peg out your sub-base aggregate level with pegs. This does two things! Firstly, it makes it easier to spread your aggregate to a preferred level and makes the paving easier to lay. A sub-base spread and compacted evenly will allow for a consistent and even mortar bed.
Once your aggregate has been spread evenly to the top of the pegs it can be compacted. This is best achieved with a vibro-compaction machine or whacker plate.
A good tip is to spread your aggregate slightly higher than the top of the pegs. This will help the aggregate to settle to top of the peg during compaction.
I have also learnt that if mot sub-base is slightly wet it compacts much better making a stronger base. Make sure you travel over the base with a whacker at least 5 times!
Setting up your laying area
When mixing and laying you’re paving I find it important to have everything to hand! This involves setting up a good laying area with all your materials and tools. I like to place my mixer, sand and cement just slightly back from my laying area. This will prevent splashes from the cement mixer staining the paving. It is good practice to lay your materials down onto plastic sheets to collect any mess. Once you’re mixing and laying area is set up you can commence with mixing mortar. Mixing your mortar
To begin mixing your mortar, turn on your mixer and empty 2 gallons of water into the drum. (2/3 of a builders bucket) Now add a cap full of mortar plasticiser and let it spin for a couple of seconds. Now add half a 25 kg bay of cement into the mixer and allow it to hydrate fully. You are aiming for a 1:4 ratio, if you are unsure, each mix can be measured out in buckets. I find half a bag of cement and 12 shovels typically works well.
Keep adding sand gradually until it reaches a stiff but workable brick laying mortar. Slab laying mortar must be wet enough to stick but not so wet the paving floats.
However too dry and powdery and your paving will not stick and form a vacuum seal with the pavers. Make sure your mortar is well mixed, stiff but workable. Laying your first pavers
One of the most critical stages of laying your patio will be the first few pavers. This is especially so if you have never laid paving before! Your first paving slabs will set your level and line for your whole patio. Before you start laying, use a long spirit level to get an idea of your sub-base level. If you have a slight gradient you know you will need to lay to that fall. It is always best to start laying your paving along a straight feature such as a wall. Try to plan your cuts so they are positioned in a less prominent and noticeable location.
Dob some mortar mix onto your sub-base and make peaks and valleys into the mortar. Place your first slab onto the mortar and start to tamp it level.
You want a consistent mortar bed underneath each slab with no gaps or voids. This does take some practice initially but you will soon get a feel for it! Take time levelling your first few pavers with a level so they are consistent and flush. Keep going trying to keep your mortar bed to the same consistent thickness as you lay. Keeping your lines square
As you lay further out from your first few slabs keep a close eye on the edges of your paving. When you look up the length of your patio you do not want to see any wavy lines. Consequently you should check your joints are consistent as you lay. This can be done with a string line or long straight edge as you lay. Using joint spacers between your individual slabs can also help to keep lines consistent. Laying your paving to falls
As you lay, make sure your falls are directing surface water to where you want it to travel. This could be a channel drain plumbed into a drainage system or simply a lower part of your garden. Laying your paving to a consistent fall can be very tricky and can take some skill. However, it is possible as a beginner if you take your time and keep your paving flush. Just make sure the bubble on your spirit level has a slight fall so water gently seeps away. You do not want a visible slope or low spots within the surface or you will get puddles. Ensuring good patio drainageThe level of patio drainage you will need to install to a new patio will depend upon the circumstances. If you are replacing soil or lawn with paving the excess surface run off will need to be mitigated. This will typically involve collecting surface water within a channel and diverting it to a soak away. If your area of paving is very small however this may not be necessary. To find out more about the right drainage for your patio visit our patio drainage article here. If you want to install drainage soak-aways or channel drains visit our step by step guides below. How to install a channel drain How to install a drainage soakaway Laying around drains and manholes
When laying a patio it is very common for your paving to fall on top of existing inspection covers. It is never ideal for these features to spoil your project or dictate its level. Consequently it is always best to raise these or lower them depending upon your new level. This is not as difficult as it always seems! you will either need to reduce or raise the chamber. For narrow chambers this could be simply cutting down or extending a plastic pipe.
However larger chambers brickwork may need to be lowered or added too. To make sure your patio looks amazing it is best to install recessed covers to inspection chambers.
These recess covers allow you to lay paving inside the lid of the cover so the surface isn’t spoiled. Why not visit my step by step guide on how to lay a patio recess manhole cover here. Cutting in pavers neatly
As you lay pavers down you will need to cut in edges and around any obstacles. This is typically executed with an abrasive wheel such as a diamond blade and grinder. This is not particularly difficult but will require some skill and careful measuring. For extra safety always wear safety goggles, safety boots and a dust mask. Never put too much pressure on the grinder and let the cutting blade do the work. Haunching & pointing
Haunching and pointing is the infilling, sealing and smoothing down of mortar around the edge of pavers. Typically a triangular fillet of mortar is rendered to the edge of paving to add extra strength. Such pointing also seals the paving preventing water seeping under the paver. Larger haunching can be applied to retaining edgings and pavers on slopes or exposed patio edges. Pointing a smooth mortar fillet is not difficult but may take some practice to master. Grouting your paving
Grouting a patio should be a simple endeavour, however more often than not it is the most problematic. Grouting is a key element of completing your patio sealing it and finishing it neatly. There are many products on the market claiming to make pointing and grouting ‘easy’ However, I personally find the finish poor quality and prefer to grout the old fashioned way. It takes much longer but looks far superior in my opinion but products like Easy joint do work perfectly well. I mix 3 parts plastering sand to 1 part cement and mix dry until a consistent colour. I then add some weather sealant mixtures to some water and very gradually add it to the mix. If you add too much water you will spoil the mix and stain the patio.
The mix should be granular and have the consistency of brown sugar. You should be able to form a ball in your hand with no seeping water from the mix.
This will enable you to achieve a sealed finish without staining your paving. Make sure grouting is done when your paving is bone dry with not threat of rain for 24 hours. Ram the mix into your gaps and joint them neatly with a pointing iron or old hose pipe. Gently brush off the any excess grouting mix as you go to reduce the threat of staining. Why not visit my full step by step patio grouting guide with pictures here.
Thank you for reading my article on how to lay a patio. If you have any questions regarding your own project feel free to email me via the contact page.
If you require patio laying services in Buckinghamshire please get in touch! Based in Amersham I serve most of Buckinghamshire as west as, Hertfordshire, Oxfordshire, and North West London. We also have also opened a Norfolk office. Our patio laying services typically cover: Amersham, Aylesbury, Bovingdon, Chalfont, Chesham, Hyde Heath, Great Missenden, Princes Risborough, High Wycombe, Penn, Beaconsfield, Tring, Gerrard's Cross and Denham. Contact us Below I will link some of my other articles you may also find relevant. Happy laying!
'As an Amazon associate I earn from qualifying purchases'
0 Comments
Leave a Reply. |
The Author
|
Landscaping services across Buckinghamshire, Amersham, Aylesbury & High Wycombe
Hyde Heath, Amersham, Buckinghamshire |
|


